Convert Horizontal Video to Vertical (9:16) for Reels
To convert horizontal video to vertical for Facebook and Instagram Reels, you have five real options: crop the centre, reframe to follow the speaker, place the full clip over a blurred background, add solid or branded bars, or stack two shots on top of each other. Every option trades off two things: how much of the original 16:9 width you keep, and how tall the remaining picture looks on a phone screen.
Most guides list a dozen apps and skip the numbers that actually decide whether your video looks sharp or blurry. This guide starts with the crop arithmetic, shows how each method changes your pixel dimensions, and gives five free commands that were run and verified, not guessed. We ran every command below with FFmpeg 6.1.1 on 16 October 2026 and re-ran the full set on 17 October 2026 on real H.264 4:2:0 test clips, then checked the output dimensions, aspect ratios, pixel formats and MP4 box order with ffprobe. For the full platform rules that your finished file must meet, see our guides to Instagram Reels size and specs and Facebook Reels size and specs.
Last checked: 17 October 2026. Tool menus and platform rules change without notice, so every figure below states what we checked and when.
Convert horizontal video to vertical: pick the method first
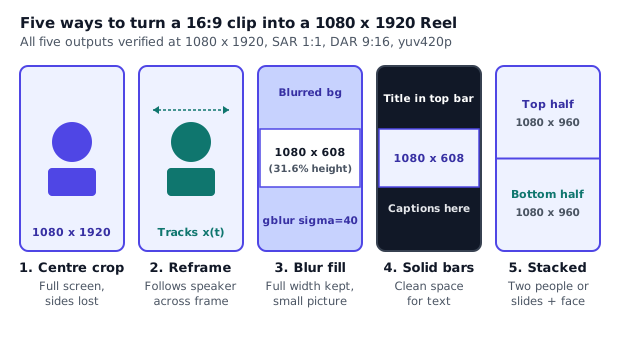
To convert horizontal video to vertical, crop the centre, reframe to follow the subject, blur-fill the top and bottom, add solid bars, or stack two shots into a split screen. Pick the method by looking at what happens at the left and right edges of your 16:9 source clip.
If one person sits in the middle of the frame and never leans out of the central third, a plain centre crop gives a full-screen 9:16 video in one step. If the speaker walks across a stage, or two people take turns speaking from opposite sides of a table, a static centre crop cuts off faces. You need either a moving crop that follows the active speaker or a two-panel vertical stack. If the clip is a software demo, a wide chart or a landscape shot where the edges hold vital detail, cropping wrecks the point of the video. You have to keep the full 16:9 width and fill the empty space above and below with a blurred copy or clean bars.
| Method | Best for | What you lose | Effort |
|---|---|---|---|
| 1. Centre crop | One speaker or product held in the middle third of the frame | About 68 percent of the horizontal width (left and right sides) | Low (one command or one timeline setting) |
| 2. Reframe to follow subject | A speaker who moves, or two people who speak one at a time | About 68 percent of the width at any given moment | Medium (keyframes, auto-reframe tool, or scripted pan) |
| 3. Blurred-background fill | Wide product shots or scenic clips where you need the whole width | The sharp picture shrinks to 31.6 percent of the screen height | Low (one filter graph or a two-track timeline) |
| 4. Solid or branded bars | Screen recordings, slides and tutorials that need a title and captions | The video sits in the middle third, framed by plain top and bottom bars | Low (one pad filter or a background canvas) |
| 5. Stack two shots | Two-person interviews, podcasts, or a speaker beside a slide deck | Each half gets a 9:8 panel (1080 by 960), not a full vertical frame | Medium (two crops aligned and stacked) |
A quick decision checklist
Ask four questions while watching five seconds of your source clip:
- Does the action stay inside the middle third of the screen? If yes, use Method 1 (centre crop) and check the source resolution in the arithmetic table below.
- Does one subject move left and right across the frame? If yes, use Method 2 (reframe) in an editor or with an auto-reframe feature so the 9:16 window tracks the subject.
- Are two people talking at once, or is someone talking over a slide? If yes, use Method 5 (stack two shots) to put one person or slide on top and the other below.
- Must the viewer read wide text or see both edges at once? If yes, keep the full width with Method 4 (solid bars) or Method 3 (blurred fill). Prefer solid bars when you want to place a headline above the clip and captions below it.
The arithmetic that decides quality
When you convert horizontal video to vertical by cropping, you do not rotate the picture. You keep the full height of your horizontal clip and slice a narrow vertical strip out of its width. That single fact explains why some converted Reels look crisp and others look blurry.
How wide is a 9:16 slice inside a 16:9 frame
A standard horizontal video has an aspect ratio of 16:9. Its width is 16 units and its height is 9 units. A vertical Reel has an aspect ratio of 9:16. When you cut a 9:16 strip from the full height of a horizontal video, the width of that strip is the source height multiplied by 9 and divided by 16:
- Crop width = source height × 9 ÷ 16
In a 1920 by 1080 video, the height is 1080 pixels. Multiply 1080 by 9 and divide by 16, and the raw answer is 607.5 pixels.
Standard consumer video uses 4:2:0 chroma subsampling (yuv420p in FFmpeg), which stores colour information in 2 by 2 blocks of pixels. Because colour blocks are two pixels wide and two pixels tall, an H.264 4:2:0 frame cannot have an odd width or an odd height. When you run FFmpeg's crop filter on a 4:2:0 clip with crop=ih*9/16:ih, FFmpeg rounds the width to an even number. In our re-run on 17 October 2026 with FFmpeg 6.1.1 on real H.264 yuv420p inputs, 607.5 rounded to 608, 405 rounded down to 404, and 1215 rounded down to 1214. Odd widths are only possible if you work in a pixel format without horizontal chroma subsampling, such as 4:4:4 or RGB.
What that crop keeps and throws away
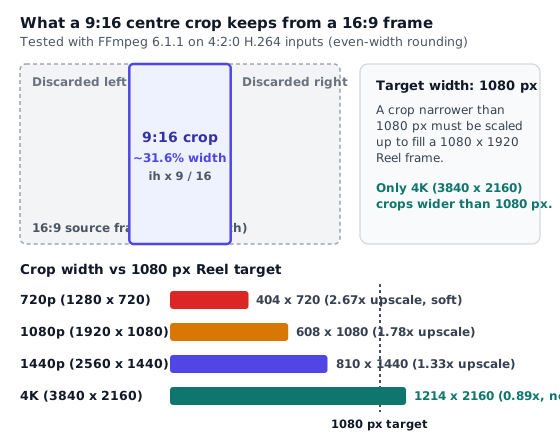
Compare the cropped width (608 pixels) with the original width (1920 pixels). Dividing 608 by 1920 gives 0.3167, or about 31.6 percent. A full-height 9:16 crop from any 16:9 video keeps just under one third of the width and throws away about 68.4 percent of the pixels.
Next, compare that cropped strip with the target size for a Reel. Meta's Reels Publishing API guide for Facebook Pages recommends 1080 by 1920 pixels (and sets 540 by 960 as the minimum), and Meta's Instagram Graph API media reference recommends a 9:16 aspect ratio with a horizontal width up to 1920 pixels. The standard master size for both platforms is 1080 by 1920 pixels.
If your cropped slice is narrower than 1080 pixels, your editor or encoder has to stretch (upscale) that slice to reach 1080 by 1920. Every step of upscaling invents pixels that were never in the camera file.
The resolution table from our FFmpeg 6.1.1 test
We generated four H.264 yuv420p test clips at standard 16:9 sizes and ran crop=ih*9/16:ih on each one with FFmpeg 6.1.1 on 17 October 2026. The table shows the exact crop dimensions FFmpeg produced and the scale factor needed to reach a 1080 by 1920 output.
| 16:9 source size | Raw maths (height × 9/16) | Actual 4:2:0 crop size | Scale factor to 1080 × 1920 | Visual result on a phone |
|---|---|---|---|---|
| 1280 × 720 (720p) | 405 × 720 | 404 × 720 | 2.67× upscale | Noticeably soft; avoid full-height crop |
| 1920 × 1080 (1080p) | 607.5 × 1080 | 608 × 1080 | 1.78× upscale | Clean on clean camera footage; softens small text |
| 2560 × 1440 (1440p) | 810 × 1440 | 810 × 1440 | 1.33× upscale | Sharp; mild upscale |
| 3840 × 2160 (4K UHD) | 1215 × 2160 | 1214 × 2160 | 0.89× downscale | Full native 1080p sharpness; zero upscale loss |
Why 4K is the sweet spot for vertical cropping
Look at the bottom row of the table. A 3840 by 2160 (4K) clip is 2160 pixels tall. When FFmpeg cuts a 9:16 strip from the full height, that strip is 1214 by 2160 pixels. Because 1214 is wider than 1080 and 2160 is taller than 1920, scaling the crop to 1080 by 1920 is a slight downscale (0.89 times). You lose zero sharpness from enlarging pixels.
By contrast, a 1280 by 720 clip produces a tiny 404 by 720 strip. Stretching 404 pixels across a 1080-pixel screen multiplies every dimension by 2.67. Even with a good resampler such as Lanczos, fine edges, hair and screen text look smeared. Notice also that 404 by 720 is below the 540 by 960 minimum resolution listed in Meta's Facebook Reels API guide if you forget to scale it up.
The arithmetic of blur-fill and bars
What if you refuse to crop and instead fit the entire 16:9 frame inside the 1080-pixel width of a vertical Reel?
When you scale a 1920 by 1080 clip down to 1080 pixels wide while keeping its 16:9 shape, the height becomes 1080 multiplied by 9 and divided by 16, which rounds to 608 pixels. Your sharp video now measures 1080 by 608 pixels in the middle of a 1080 by 1920 canvas.
Divide 608 by 1920 and you get the same 31.6 percent ratio, turned on its side:
- Full-height crop: uses 100 percent of the phone screen height, by keeping 31.6 percent of your camera's horizontal width.
- Blur-fill or bars: keeps 100 percent of your camera's horizontal width, by using only 31.6 percent of the phone screen height (608 pixels out of 1920), leaving 1312 vertical pixels (656 above and 656 below) to fill with blur or solid colour.
Knowing both numbers makes the choice easy. Use a full-height crop when the face or object is the story. Use bars or blur-fill when the full width is the story, and remember that any text inside that 1080 by 608 strip will look tiny on a phone.
Method 1: centre crop
A centre crop takes the middle 9:16 strip of your horizontal video and scales it to 1080 by 1920. It is the fastest way to convert horizontal video to vertical when a single speaker, product or demonstration stays near the centre of the camera frame from start to finish.
When a centre crop works and when it fails
Use a centre crop when:
- One person is speaking straight to the lens, framed in the middle third of the screen.
- A hands-on demonstration happens on a workbench or desk directly in front of the camera.
- Your source clip is 1080p, 1440p or 4K, so the upscale factor is 1.78 times or less.
Skip a centre crop when:
- Two people sit on the left and right halves of a couch or split screen (the centre crop will show the wall between them).
- The speaker paces back and forth across a whiteboard.
- Your source is a 16:9 desktop recording where menus sit in the top-left corner and the action happens on the right.
- Your source is 720p and full of fine detail.
The tested FFmpeg command for a centre crop
We tested this command with FFmpeg 6.1.1 on 16 and 17 October 2026 on a 1920 by 1080 H.264 clip:
ffmpeg -i in.mp4 \
  -vf "crop=ih*9/16:ih,scale=1080:1920:flags=lanczos,setsar=1" \
  -c:v libx264 -profile:v high -preset medium -crf 20 -pix_fmt yuv420p \
  -r 30 -g 60 -sc_threshold 0 -bf 0 \
  -c:a aac -b:a 128k -ar 48000 -ac 2 \
  -movflags +faststart -use_editlist 0 out-crop.mp4
How each filter part works
The -vf (video filter) chain runs three steps in order, documented in the FFmpeg filters manual:
crop=ih*9/16:ihsets the output width (ow) to the input height (ih) multiplied by 9/16, and keeps the full input height (ih). When you omit thexandycoordinates, FFmpeg'scropfilter automatically centres the window at(iw-ow)/2horizontally and0vertically. On a 1920 by 1080 4:2:0 clip, this cuts a 608 by 1080 strip starting 656 pixels from the left edge.scale=1080:1920:flags=lanczosresizes that strip to 1080 by 1920 pixels using the Lanczos scaling algorithm. Lanczos preserves sharper edges than FFmpeg's default bicubic scaler when upscaling a 1080p crop by 1.78 times.setsar=1sets the sample aspect ratio (pixel aspect ratio) to 1:1 (square pixels). Withoutsetsar=1, rounding from 607.5 to 608 can leave a fractional sample aspect ratio in the file metadata, and strict API validators expect square pixels with a clean 9:16 display aspect ratio.
Shifting the crop left or right for an off-centre speaker
Often a solo speaker sits slightly to the left or right of centre—for example, framed on the left third during an interview so a graphic could sit on the right. You do not need keyframes if the person stays in that spot. Just pass an x coordinate to crop:
- Left edge of the frame:
crop=w=ih*9/16:h=ih:x=0:y=0 - One third from the left:
crop=w=ih*9/16:h=ih:x=(iw-ow)*0.33:y=0 - Two thirds from the left:
crop=w=ih*9/16:h=ih:x=(iw-ow)*0.67:y=0 - Right edge of the frame:
crop=w=ih*9/16:h=ih:x=iw-ow:y=0
In every case, (iw-ow) is the total horizontal travel available to the 9:16 window inside the 16:9 frame. On a 1920 by 1080 video where ow is 608, (iw-ow) is 1312 pixels. Multiplying (iw-ow) by a number between 0 (far left) and 1 (far right) places the window anywhere along the width without ever letting the crop box step outside the source frame.
Method 2: reframe so the subject stays in frame
When a speaker walks across a stage, turns to point at a board, or shares a single camera with a co-host, no fixed horizontal position works for the whole clip. You need to reframe the video over time so the 9:16 window moves horizontally to keep the active subject centred.
You can do this in three ways: manually with position keyframes in any video editor, automatically with a desktop or mobile editor's subject-tracking tool, or with a time-based mathematical expression in FFmpeg when the motion follows a predictable path.
Manual keyframing in any timeline editor
Manual reframing is often faster and cleaner than automatic tracking on a 30-to-60-second Reel, because a human editor knows who is about to speak before they open their mouth. Automatic trackers often lag behind a turn of conversation or get distracted by someone waving a hand in the background.
Follow these steps in Premiere Pro, Final Cut Pro, DaVinci Resolve or any timeline editor:
- Create a 1080 by 1920 vertical sequence or project at 30 frames per second.
- Drop the 16:9 clip onto the timeline. If the editor shrinks the clip to fit inside the 1080-pixel width (leaving black bars above and below), change the clip's spatial conform or scale until its height fills the full 1920-pixel frame. For a 1920 by 1080 clip, that scale is
177.8%(1920 ÷ 1080 × 100). For a 3840 by 2160 clip, it is88.9%(1920 ÷ 2160 × 100). - Scrub to the start of the clip and click the keyframe stopwatch next to the horizontal Position (X) control. Slide the X value left or right until the speaker's eyes sit near the horizontal centre.
- Play forward until the speaker moves or another person starts talking. If it is a sudden switch between two people on a couch, place a Hold (constant) keyframe one frame before the switch and a new position keyframe on the cut frame. That creates an instant camera cut from person A to person B without a dizzying whip-pan across the empty space between them.
- If the speaker walks smoothly, place a regular linear or ease-in/ease-out keyframe where they start walking and another where they stop. Keep pans slow and steady; jerky horizontal adjustments every two seconds make viewers feel seasick on a phone screen.
Adobe Premiere Pro: Auto Reframe Sequence
If you edit in Adobe Premiere Pro and have many clips or a moving subject, Adobe provides a built-in sequence converter documented on its Auto Reframe sequences help page.
Here is how the sequence workflow works:
- Right-click your finished 16:9 sequence in the Project panel (or open the Sequence menu at the top of the screen) and choose Auto Reframe Sequence.
- Set the Target Aspect Ratio preset to Vertical (9:16).
- Pick one of the three Motion Tracking presets:
- Slower Motion: best for talking-head interviews and tutorials where the camera barely moves and you want as few pans as possible.
- Default: balanced tracking for general video.
- Faster Motion: built for sports, dance or action clips where the subject crosses the frame quickly.
- Choose how to handle clip nesting. If you haven't applied custom motion keyframes to your clips, choose Don't Nest Clips so Premiere replaces transform keyframes directly. If your sequence already has scale or position animation, choose Nest Clips to keep those keyframes inside nested sequences, though Premiere does not reframe across edit points inside a nest.
- Click Create. Premiere analyses the video in the background and generates position keyframes on the Auto Reframe effect for every clip.
One practical detail worth checking in Premiere: when you auto-reframe a 1920 by 1080 sequence to 9:16, the new sequence preserves the source vertical height (about 607 or 608 by 1080) unless you step up the sequence or export dimensions to 1080 by 1920. Always inspect Sequence > Sequence Settings (or your Export scaling settings) to confirm your final file comes out at 1080 by 1920 rather than 608 by 1080. And because Auto Reframe creates standard keyframes, you can open the Effect Controls panel on any shot where the tracker drifted and drag the individual keyframe back onto the speaker.
Apple Final Cut Pro for Mac: Smart Conform
On a Mac, Final Cut Pro includes a machine-learning framing tool called Smart Conform, documented on Apple's Adjust framing with Smart Conform support page.
To convert a horizontal project in Final Cut Pro:
- Select your 16:9 project in the browser.
- Open Edit > Duplicate Project As (or right-click the project and choose Duplicate Project As).
- Set the Video format to Vertical, pick 1080 x 1920 for the resolution, and tick the Smart Conform checkbox. (You can also apply it to an existing vertical project by selecting clips and choosing Modify > Smart Conform.)
- Final Cut Pro analyses the faces and high-contrast action in each clip and adds Transform keyframes to keep the main subject inside the 9:16 frame.
- After the analysis finishes, scrub through the timeline with the Transform overlay turned on in the viewer so you can nudge any shot where the framing feels too tight.
DaVinci Resolve, CapCut and Edits by Instagram: what is confirmed and what is not
Many comparison posts list every editor as free and automatic without checking the small print. Here is what we could and could not confirm from official pages as of 17 October 2026:
- DaVinci Resolve (Smart Reframe): Resolve includes an automatic Smart Reframe control in the Inspector under Transform that can track an automatic point of interest or a bounding box you draw around a face. However, third-party tutorials and forum threads report Smart Reframe as a paid DaVinci Resolve Studio feature, while a few recent write-ups claim a basic version exists in the free edition. Because Blackmagic Design's public web pages did not let us verify the current free-versus-Studio split for Smart Reframe on 17 October 2026, treat automatic Smart Reframe as a Studio feature unless you see the button active in your own copy. Manual keyframing under Transform > Position X works in the free edition of DaVinci Resolve without restriction.
- CapCut (Auto Reframe): CapCut markets an Auto Reframe feature for 9:16 conversion on desktop, mobile and web. Because CapCut frequently moves features between its free tier and its paid CapCut Pro subscription, and no official CapCut help page we could read on 17 October 2026 guaranteed which auto-reframe options stay free without a watermark, open the export screen on a five-second test clip before building a workflow around it.
- Edits by Instagram: Meta launched its standalone mobile video creation app, Edits by Instagram (also covered in the Instagram Help Center article on Edits), in April 2025 as a free app for creators. While Edits is built around vertical 9:16 timelines and camera capture, we could not confirm an automatic subject-tracking reframe feature from Instagram's official pages on 17 October 2026. You can pinch and drag a horizontal clip inside the vertical frame by hand.
- PublishClip Studio: Our own browser-based video Studio (which will include trimming, reframing to 9:16, captions and covers) is in progress as of 17 October 2026. Today, PublishClip requires a video that is already 9:16.
What plain FFmpeg can and cannot do (scripted pan)
Let us state one technical limit plainly: plain FFmpeg cannot track a face or follow a moving subject on its own. FFmpeg's crop filter has no computer-vision model that recognises people.
What FFmpeg's crop filter does do is evaluate its x and y expressions on every single frame, using the timestamp variable t (in seconds) or frame number n. If you know that a camera pans smoothly from left to right, or you want a slow, gentle pan across a wide scenic shot, or you want to jump from left (x=200) to right (x=900) at a specific timestamp (such as t=4.5), you can script the exact motion in FFmpeg.
We tested this scripted pan command with FFmpeg 6.1.1 on 17 October 2026:
ffmpeg -i in.mp4 \
  -vf "crop=w=ih*9/16:h=ih:x='(iw-ow)*(0.5+0.5*sin(2*PI*t/10))':y=0,scale=1080:1920:flags=lanczos,setsar=1" \
  -c:v libx264 -profile:v high -preset medium -crf 20 -pix_fmt yuv420p \
  -r 30 -g 60 -sc_threshold 0 -bf 0 \
  -c:a aac -b:a 128k -ar 48000 -ac 2 \
  -movflags +faststart -use_editlist 0 out-pan.mp4
In that expression, 0.5+0.5*sin(2*PI*t/10) smoothly glides the 9:16 crop window across the 16:9 frame over a 10-second cycle, never stepping past 0 or iw-ow.
For a real two-person interview where Speaker A talks for the first 6 seconds on the left (x=180) and Speaker B talks from second 6 onward on the right (x=980), use FFmpeg's if(lt(t,6),180,980) expression inside x:
ffmpeg -i in.mp4 \
  -vf "crop=w=ih*9/16:h=ih:x='if(lt(t,6),180,980)':y=0,scale=1080:1920:flags=lanczos,setsar=1" \
  -c:v libx264 -profile:v high -preset medium -crf 20 -pix_fmt yuv420p \
  -r 30 -g 60 -sc_threshold 0 -bf 0 \
  -c:a aac -b:a 128k -ar 48000 -ac 2 \
  -movflags +faststart -use_editlist 0 out-cut.mp4
That gives you a clean, instant camera cut at the 6.0-second mark without opening a graphical editor.
Method 3: blurred-background fill
When cropping cuts off essential parts of the picture—a wide group photo, a vehicle moving across the whole frame, a sports play or a landscape shot—you can keep the entire 16:9 image at full width in the middle of the screen and fill the empty vertical space above and below with a scaled-up, heavily blurred copy of the same video.
How the blurred-background filter graph works
In a timeline editor, you make a blurred fill by placing the same clip on two video tracks: scale the bottom track up until it fills the 1080 by 1920 frame and add a Gaussian Blur effect, then scale the top track down to fit the 1080-pixel width (1080 by 608).
In FFmpeg, you do the exact same thing in a single pass using -filter_complex. We ran and verified this command with FFmpeg 6.1.1 on 16 and 17 October 2026:
ffmpeg -i in.mp4 \
  -filter_complex "[0:v]split=2[bg][fg];[bg]scale=1080:1920:force_original_aspect_ratio=increase,crop=1080:1920,gblur=sigma=40[bgb];[fg]scale=1080:-2:flags=lanczos[fgs];[bgb][fgs]overlay=(W-w)/2:(H-h)/2,setsar=1[v]" \
  -map "[v]" -map 0:a \
  -c:v libx264 -profile:v high -preset medium -crf 20 -pix_fmt yuv420p \
  -r 30 -g 60 -sc_threshold 0 -bf 0 \
  -c:a aac -b:a 128k -ar 48000 -ac 2 \
  -movflags +faststart -use_editlist 0 out-blur.mp4
Here is what each step in -filter_complex does:
[0:v]split=2[bg][fg]clones the input video stream into two identical branches:[bg]for the background and[fg]for the sharp foreground.[bg]scale=1080:1920:force_original_aspect_ratio=increase,crop=1080:1920,gblur=sigma=40[bgb]scales the background branch up until it completely covers 1080 by 1920, crops the overhanging sides to 1080 by 1920, and applies a Gaussian blur (gblur) withsigma=40. A sigma of 40 is strong enough that moving shapes in the background turn into soft colour washes rather than distracting ghost faces.[fg]scale=1080:-2:flags=lanczos[fgs]scales the sharp foreground clip to 1080 pixels wide with Lanczos resampling. Passing-2for the height tells FFmpeg to calculate the proportional height and round it to the nearest even number (608pixels for a 16:9 source), keeping 4:2:0 chroma happy.[bgb][fgs]overlay=(W-w)/2:(H-h)/2,setsar=1[v]centres the 1080 by 608 sharp foreground aty = (1920 - 608) / 2 = 656pixels from the top over the blurred 1080 by 1920 background, sets square pixels, and labels the combined video[v].-map "[v]" -map 0:asends the combined video stream and the original audio track to the encoder. (If your source clip has no audio track, or you want to make the command safe for silent clips too, write-map 0:a?with a question mark.)
Honest pros and cons of blurred fill
The big advantage of blurred fill is zero cropping: every pixel from left to right stays visible, and a 720p clip does not have to be upscaled by 2.67 times to fill the height.
The drawbacks are visual and practical:
- The picture is small. At 1080 by 608 pixels, the sharp image occupies only 31.6 percent of the phone's height. Small UI labels, spreadsheet cells or distant faces inside that strip are hard to read on a 6-inch screen.
- Motion in the blur can distract the eye. If the camera pans quickly or bright lights flash near the edges, the blurred top and bottom bands pulse and compete with the centre clip, especially behind white captions.
- Colour banding in smooth blurs. Strong Gaussian blurs create smooth colour gradients. When compressed heavily, smooth gradients can show visible steps ("banding") in dark areas. Using
-crf 20(as in our command) keeps enough bitrate to hold the gradient clean before uploading. - Look and feel. Blurred fill was everywhere on television news and early social video five years ago. Today, when viewers scroll through native 9:16 Reels, a blurred-edge clip immediately signals repurposed horizontal footage. If you want to keep the full 16:9 width and make the video look intentional, solid or branded bars (Method 4) usually read cleaner.
Method 4: solid or branded bars
Instead of filling the top and bottom 656 pixels with a pulsing blur, you can pad the 1080 by 608 video onto a solid dark slate, off-black or brand-coloured 1080 by 1920 canvas. That turns empty space into a deliberate layout: a static headline sits in the top bar above the clip, the full 16:9 video plays in the middle, and burned-in captions sit in the bottom bar below the video.
The tested FFmpeg command for solid bars
We tested this command with FFmpeg 6.1.1 on 16 and 17 October 2026:
ffmpeg -i in.mp4 \
  -vf "scale=1080:1920:force_original_aspect_ratio=decrease,pad=1080:1920:(ow-iw)/2:(oh-ih)/2:color=0x101820,setsar=1" \
  -c:v libx264 -profile:v high -preset medium -crf 20 -pix_fmt yuv420p \
  -r 30 -g 60 -sc_threshold 0 -bf 0 \
  -c:a aac -b:a 128k -ar 48000 -ac 2 \
  -movflags +faststart -use_editlist 0 out-bars.mp4
How the scale and pad filters work together
scale=1080:1920:force_original_aspect_ratio=decreasescales the input video so it fits inside a 1080 by 1920 bounding box without stretching. For any horizontal 16:9 clip (whether 720p, 1080p or 4K), the width hits 1080 first and the height lands at 608 pixels.pad=1080:1920:(ow-iw)/2:(oh-ih)/2:color=0x101820creates a 1080 by 1920 canvas filled with the hex colour#101820(a deep charcoal slate) and places the 1080 by 608 video dead centre at(ow-iw)/2horizontally (0) and(oh-ih)/2vertically (656pixels from the top).setsar=1locks the pixel aspect ratio to 1:1.
Using the top and bottom bars well
A 1080 by 608 video centred in a 1080 by 1920 frame runs from y = 656 to y = 1264. That gives you two clean 1080 by 656 rectangles:
- Top bar (
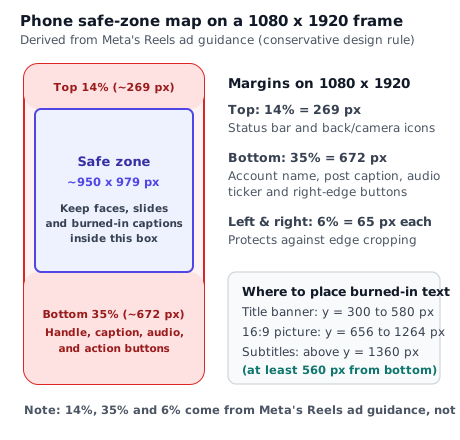
y = 0to656): Keep the top 269 pixels clear for the phone's status bar and Reels top icons, then place a short two-line title betweeny = 320andy = 580. Viewers see immediately what the clip is about while scrolling, and your title never covers the video itself. - Bottom bar (
y = 1264to1920): Place your burned-in subtitles directly under the video betweeny = 1290andy = 1360, well above the bottom 672-pixel zone where Instagram and Facebook draw the account handle, post caption and audio ticker. Because the bar behind the text is a solid dark colour (#101820), white caption text achieves high contrast on every single frame without needing a semi-transparent box over the speaker's shirt.
Method 5: stack two shots
When your horizontal video has two distinct regions of interest at the same time—two podcast hosts sitting on opposite ends of a desk, a webinar recording with a webcam in the corner and a slide deck beside it, or a side-by-side product comparison—none of the single-window methods work well. A centre crop cuts both people in half, and a 1080 by 608 letterbox makes both faces tiny.
The clean solution is to slice the 16:9 frame into a left half and a right half, crop each half into a 1080 by 960 rectangle (a 9:8 aspect ratio), and stack them vertically with FFmpeg's vstack filter or two timeline tracks. Stacked together, two 1080 by 960 panels make a 1080 by 1920 vertical Reel.
The tested FFmpeg command for a two-shot vertical stack
We tested this command with FFmpeg 6.1.1 on 16 and 17 October 2026:
ffmpeg -i in.mp4 \
  -filter_complex "[0:v]split=2[l][r];[l]crop=iw/2:ih:0:0,scale=1080:960:force_original_aspect_ratio=increase,crop=1080:960[top];[r]crop=iw/2:ih:iw/2:0,scale=1080:960:force_original_aspect_ratio=increase,crop=1080:960[bot];[top][bot]vstack,setsar=1[v]" \
  -map "[v]" -map 0:a \
  -c:v libx264 -profile:v high -preset medium -crf 20 -pix_fmt yuv420p \
  -r 30 -g 60 -sc_threshold 0 -bf 0 \
  -c:a aac -b:a 128k -ar 48000 -ac 2 \
  -movflags +faststart -use_editlist 0 out-stack.mp4
How the stacked filter graph works
[0:v]split=2[l][r]duplicates the horizontal video stream into a left branch[l]and a right branch[r].[l]crop=iw/2:ih:0:0,scale=1080:960:force_original_aspect_ratio=increase,crop=1080:960[top]takes the left half of the video (x=0, widthiw/2, full heightih). On a 1920 by 1080 clip, that half is 960 by 1080. Next, it scales that half up just enough to fill 1080 pixels wide (which makes it 1080 by 1215) and crops the centre 1080 by 960 panel ([top]). Notice the upscale maths here: 960 scaled to 1080 is only a 1.125 times upscale, which is much sharper than the 1.78 times upscale of a full-height 9:16 crop from 1080p.[r]crop=iw/2:ih:iw/2:0,scale=1080:960:force_original_aspect_ratio=increase,crop=1080:960[bot]does the exact same thing to the right half of the frame (x=iw/2), producing the bottom 1080 by 960 panel ([bot]).[top][bot]vstack,setsar=1[v]stacks[top]above[bot]to form a 1080 by 1920 frame with square pixels.
Stacking a speaker and a screen recording
You can also use vstack when you have two separate horizontal files—for example, slides.mp4 and camera.mp4 recorded during a webinar or software demo:
- Put the slides or screen demo in the top panel (
[top],y = 0to960), because the top half of a Reel has far less app UI covering it than the bottom half. - Put the speaker's face in the bottom panel (
[bot],y = 960to1920), framed slightly high in that panel so their chin stays above the bottom caption overlay. - Place burned-in subtitles across the seam (
y = 900to1020) right between the two panels. Placing captions on the dividing line keeps both the slide and the speaker's face unobstructed and puts the text dead centre in the viewer's line of sight.
Frame it for the phone: safe zones and text
Converting a clip from 16:9 to 9:16 is only half the job. When someone watches your Reel on a phone, Instagram and Facebook draw buttons, account names, captions and audio tickers directly on top of the video. If your reframed crop puts a speaker's face, a software menu or burned-in subtitles under those buttons, viewers cannot read them.
Where the 14%, 35% and 6% numbers come from
You will see three percentages repeated across dozens of social media guides: keep text out of the top 14 percent, the bottom 35 percent, and the left and right 6 percent of a 9:16 frame.
Let us be exact about the source of those numbers: they come from Meta's Business Help Center guide on text overlays and safe zones for ads in Stories and Reels. Meta publishes them as guidance for paid Reels ads (which also carry a sponsored label and a call-to-action button near the bottom), not as an official rule for organic Reels. Because organic Reels still show the creator's handle, the post caption, the audio marquee and a vertical column of like, comment, share and save buttons on the lower right, treating Meta's ad safe zone as a conservative design rule works well for organic Reels too.
On a standard 1080 by 1920 frame, those percentages translate to these exact pixel margins:
| Edge of 1080 × 1920 frame | Ad guidance percentage | Pixel margin | What the app draws there |
|---|---|---|---|
| Top edge | 14% of 1920 | 269 px (`y = 0` to `269`) | Phone status bar, camera icon, Reels heading |
| Bottom edge | 35% of 1920 | 672 px (`y = 1248` to `1920`) | Account handle, follow button, post caption, audio ticker |
| Left edge | 6% of 1080 | 65 px (`x = 0` to `65`) | Edge bleed on narrower phone screens |
| Right edge | 6% of 1080 (wider in lower half) | 65 px (`x = 1015` to `1080`) | Edge bleed, plus like/comment/share icons on the lower right |
| Central safe zone | 88% wide × 51% tall | 950 × 979 px (`x = 65..1015`, `y = 269..1248`) | Clear across both apps |
How safe zones affect your conversion method
- In a centre crop or reframe (Methods 1 and 2): Keep the speaker's eyes in the upper half of the central safe zone, around
y = 550to750pixels from the top. Never frame a person's face in the bottom third of a 9:16 crop, or their mouth and chin will sit behind your post caption. - In a blur-fill or solid-bar layout (Methods 3 and 4): A 1080 by 608 horizontal clip centred vertically spans
y = 656toy = 1264. That fits almost entirely inside the vertical safe zone (y = 269to1248), with only the bottom 16 pixels touching the 35 percent line. If the bottom of your 16:9 clip has important status bars or subtitles (such as a video game HUD or a code terminal's bottom line), nudge the 16:9 clip 100 pixels higher inpadoroverlay(for example,y = 556instead of656) so the entire 16:9 picture clears the bottom overlay. - For burned-in captions: Place subtitles above the bottom 35 percent zone—at least 560 to 672 pixels up from the bottom edge—or on the seam of a stacked layout. Our step-by-step guide to adding captions to Reels explains the exact FFmpeg subtitle filter settings (including a libass coordinate gotcha that pushes SRT text off screen if you pass raw pixel numbers).
- For your profile grid and cover: When an Instagram Reel appears on your profile grid, Instagram crops the 9:16 cover to a taller rectangle (3:4 on current grids, or 1:1 on the main feed). Our Instagram Reel cover guide shows how to keep your title inside both the 9:16 safe zone and the profile grid crop.
Export settings that Facebook and Instagram accept
Once your filter chain turns the video into a 1080 by 1920 vertical stream, the encoder flags at the end of the command decide whether Facebook, Instagram and third-party scheduling tools accept the file cleanly.
What Meta's API specifications actually ask for
We checked both official developer specifications on 17 October 2026:
- Instagram Reels (IG User Media reference): MOV or MP4 container with no edit lists and the
moovatom at the front of the file; H.264 or HEVC video, progressive scan, closed GOP, 4:2:0 chroma subsampling; 23 to 60 frames per second; maximum horizontal width 1920 pixels; recommended 9:16 aspect ratio; video bitrate up to 25 Mbps VBR; AAC audio up to 48 kHz, mono or stereo, up to 128 kbps; duration 3 seconds to 15 minutes; file size up to 300 MB. - Facebook Reels (Reels Publishing API for Pages): Recommended
.mp4container; H.264 or H.265 video (VP9 and AV1 also supported), progressive, 4:2:0 chroma, closed GOP of 2 to 5 seconds; fixed frame rate from 24 to 60 fps; recommended 1080 by 1920 resolution (minimum 540 by 960) at 9:16; AAC-LC stereo audio at 48 kHz and 128 kbps or higher; duration 3 to 90 seconds through the API.
When you combine the strictest rule from each column, one master export profile passes both platforms and every API-based scheduler. For the complete breakdown of app limits versus API limits, see our guides to Instagram Reels size and specs and Facebook Reels size and specs.
The canonical export flags and why each flag is there
Every recipe in this guide ends with the exact same set of encoding flags, following the FFmpeg H.264 encoding guide and Meta's container rules:
  -c:v libx264 -profile:v high -preset medium -crf 20 -pix_fmt yuv420p \
  -r 30 -g 60 -sc_threshold 0 -bf 0 \
  -c:a aac -b:a 128k -ar 48000 -ac 2 \
  -movflags +faststart -use_editlist 0 out.mp4
Here is what we found when we tested these flags with FFmpeg 6.1.1 on 16 and 17 October 2026 and inspected the resulting MP4 atoms:
-c:v libx264 -profile:v high -preset medium -crf 20: Encodes progressive H.264 High profile video at constant rate factor 20, which keeps crisp detail on 1080 by 1920 footage while staying well below Meta's 25 Mbps ceiling.-pix_fmt yuv420p: Forces 8-bit 4:2:0 chroma subsampling. In our test, feeding a 10-bit H.264 source clip intolibx264without-pix_fmt yuv420pproduced a High 10 profile (yuv420p10le) file. Meta's specification lists 4:2:0 H.264 or HEVC and says nothing about 10-bit profiles. Including-pix_fmt yuv420pis a safe precaution whenever you convert 10-bit footage from modern mirrorless cameras or iPhones.-r 30 -g 60 -sc_threshold 0: Outputs a fixed 30 frames per second (r_frame_rate 30/1) and places a closed-GOP keyframe (I-frame) every 60 frames—about every 2 seconds—matching Facebook's 2-to-5-second closed GOP requirement. (libx264uses closed GOPs by default.)-movflags +faststart: In a default FFmpeg MP4 encode with no flags, FFmpeg writes themoovindex box after themdatmedia data (ftyp,free,mdat,moov). Adding-movflags +faststartruns a second pass at the end of encoding that movesmoovto the front (ftyp,moov,free,mdat), matching Meta's "moov atom at the front" specification so servers can inspect and stream the file before downloading all of it.-use_editlist 0 -bf 0: A default FFmpeg MP4 encode writes twoedts/elst(edit list) boxes—one for video and one for audio—even after you add-movflags +faststart. Meta's Instagram Reel specification explicitly says "no edit lists". Passing-use_editlist 0suppresses both edit-list boxes. In our first test with B-frames enabled, removing edit lists caused the video stream'sstart_timeto sit at0.067seconds while audio started at0.000. Adding-bf 0(no B-frames) kept both audio and video starting at0.000000with zero edit lists. Note one minor muxer quirk we measured: with-use_editlist 0, FFmpeg shifts video frames after the first frame by one AAC priming packet (1024 samples at 48 kHz, about 21 milliseconds), so the second keyframe lands at2.021seconds andavg_frame_ratereads about29.84whiler_frame_ratestays30/1. Audio and video stay in sync. Meta does not publish how strictly its servers enforce the "no edit lists" line, so treat these flags as the documented target and remember that a test publish is the only final proof.-c:a aac -b:a 128k -ar 48000 -ac 2: Encodes stereo (2-channel) AAC-LC audio at 48 kHz and 128 kbps, matching both the Instagram (up to 48 kHz, 128 kbps) and Facebook (stereo, 48 kHz, 128 kbps+) tables.
How to check your converted file with ffprobe
Before you upload a converted file or queue it in a scheduler, run this ffprobe command to verify its streams and duration in two seconds:
ffprobe -v error \
  -show_entries stream=codec_type,codec_name,profile,width,height,r_frame_rate,pix_fmt,bit_rate,sample_rate,channels:format=duration,size,bit_rate \
  -of default=nw=1 out.mp4
Check five lines in the output:
width=1080andheight=1920codec_name=h264,profile=Highandpix_fmt=yuv420pr_frame_rate=30/1(or your chosen fixed rate between 24 and 60)codec_name=aac,sample_rate=48000andchannels=2durationbetween3.0and90.0seconds if you publish to Facebook Pages or through a multi-platform scheduling tool.
If a converted file still fails when you try to post it, walk through our troubleshooting guide for an Instagram Reel not uploading, which decodes the exact error numbers Meta returns for aspect ratio (1363040), resolution (1363127), duration (1363128), frame rate (1363129) and unsupported container formats (2207026).
Shoot horizontal now, convert later: a better way
The easiest way to convert horizontal video to vertical is to plan for the 9:16 crop before you press record on your 16:9 camera. If you film a YouTube video, a course lesson, a podcast or a product demo that will also become Reels, five small habits on set save hours in the edit.
1. Record in 4K (3840 by 2160), even if your horizontal master is 1080p
As our crop arithmetic table showed, a 9:16 full-height crop from 3840 by 2160 measures 1214 by 2160 pixels. That gives you more than enough pixels to export a native 1080 by 1920 vertical Reel with zero upscaling, while your 16:9 YouTube cut downscales cleanly to 1080p or stays in 4K. Recording in 1080p forces a 1.78 times upscale on every vertical crop.
2. Frame the subject inside the central third
Turn on your camera's 3×3 grid overlay in the viewfinder. The middle column of a 3×3 grid is 33.3 percent of the frame width—almost identical to the 31.6 percent width of a 9:16 crop inside a 16:9 frame. Keep your speaker's head, shoulders and hand gestures inside that centre grid column, and your horizontal footage will convert to 9:16 with a static centre crop every time.
3. Step the camera back and leave extra headroom
When you frame a tight close-up in 16:9—cutting off the top of the speaker's hair and framing just below the collarbones—a 9:16 crop at the same height feels claustrophobic, because the sides of the frame press right against the speaker's ears. Step the camera back half a metre (or zoom out slightly) so you see the speaker from the waist or chest up, with comfortable air above their head. That wider framing looks relaxed in 16:9 and gives a natural medium close-up when cropped to 9:16.
4. Keep screen recordings at high UI scale
If you record a software tutorial on a 16:9 monitor and plan to cut vertical Reels from it, do not record the full desktop at 100 percent scaling. Zoom the browser or code editor to 150% or 175%, or resize the application window to a narrower rectangle near the middle of your screen. Large fonts and compact window layouts survive both a narrow crop and a 1080 by 608 padded layout.
5. Shoot ten seconds of vertical or wide B-roll
When a speaker describes a wide object—a dashboard, a retail shelf, a kitchen counter—film one extra five-second pass where you pan slowly across the object, or hold up a phone to grab a native 9:16 cutaway. Dropping a three-second cutaway over a tricky moment lets you hide a reframe jump or replace a tiny letterboxed wide shot. For a complete weekly system that turns one long horizontal shoot into a month of short clips, see our guide to repurposing video content.
Mistakes that make converted video look cheap
Even when a file passes Meta's technical checks, six common editing mistakes make a converted Reel look awkward in the feed. Check your export against this list before you publish:
- Stretching 16:9 to 9:16 without cropping or padding. If you run
scale=1080:1920in FFmpeg (or untick "Uniform Scale" in an editor) withoutcrop,padorforce_original_aspect_ratio, the entire 16:9 width is squeezed into 1080 pixels and stretched tall. Faces look narrow and squashed. Always crop first, or useforce_original_aspect_ratio=decreasewithpad. - Double bars (black bars inside a blurred fill). This happens when you export a 16:9 video that already had letterbox bars baked into it, and then drop that file into a blur-fill template. You end up with a 16:9 picture, black strips above and below it, and blurred video outside the black strips. Crop away any baked-in black bars before building the blur fill.
- Burned-in text sitting under the Reels caption and buttons. If you burn subtitles into the bottom 10 percent of your 16:9 video before cropping to 9:16, two bad things happen: the left and right ends of every subtitle line get sliced off by the 9:16 crop, and the remaining middle words sit at the very bottom of the 1920-pixel screen right behind the account name and audio ticker. Always convert to 9:16 first, then burn in captions inside the 9:16 safe zone.
- Upscaling a 720p webcam clip to full-screen 9:16. A 404 by 720 crop stretched 2.67 times to 1080 by 1920 turns a soft webcam feed into a blocky smear. When your only source is 720p, use Method 4 (solid bars) or Method 5 (stacked 1080 by 960 panels) so you never upscale the pixels past 1.4 times.
- Variable frame rate (VFR) from phones and screen recorders. Screen recording tools and some phones record variable frame rates that dip when the screen is static. When you reframe or add burned-in captions, VFR can cause audio drift or stutter. Passing
-r 30in our export command converts the output to a constant 30 frames per second. - Dropping the audio track during
-filter_complex. When you switch from simple-vffilters to-filter_complex(as in Method 3 and Method 5) and map-map "[v]", FFmpeg only includes the streams you explicitly map. If you forget-map 0:a, your finished Reel is completely silent.
Do it in your browser with PublishClip
Once you have converted your clip to a 9:16 vertical file, you still have to get it onto Facebook Reels and Instagram Reels with the right encoding and captions.
PublishClip is our free web app for publishing and scheduling Facebook Reels and Instagram Reels through Meta's official Graph API. Here is what it does today (as of 17 October 2026), stated plainly so you know what to expect:
- Requires a 9:16 vertical video today: You upload one vertical 9:16 video between 3 and 90 seconds long. PublishClip does not crop or reframe horizontal 16:9 videos today, so run one of the five methods in this guide before uploading.
- Converts in your browser when needed: If your 9:16 clip is not already an H.264 and AAC MP4, PublishClip converts it inside your browser using WebAssembly (
ffmpeg.wasm) before uploading, so raw editing files never have to be transcoded on a third-party server. - Posts to Facebook Reels and Instagram Reels: You connect your Facebook Page and its linked Instagram professional account, write a separate caption for each platform if you like, and publish immediately or set a scheduled time in your time zone.
- PublishClip Studio is in progress: We are building a browser-based video Studio (
/studio) that will let you trim clips, reframe horizontal footage to 9:16, burn in captions and pick covers directly in the browser. As of 17 October 2026, the Studio is still in progress, so we do not promise a release date.
Key takeaways
- To convert horizontal video to vertical (9:16), choose between five methods: centre crop, reframe to follow the subject, blurred-background fill, solid or branded bars, or stacking two shots.
- A full-height 9:16 crop from a 16:9 frame keeps
height × 9 ÷ 16of the width—about 31.6 percent—and rounds to an even pixel width in 4:2:0 video (404×720from 720p,608×1080from 1080p,810×1440from 1440p, and1214×2160from 4K). - Only a 4K (3840 by 2160) source yields a 9:16 crop wider than 1080 pixels (
1214×2160), avoiding any upscale loss when exported at 1080 by 1920. - Keeping the full 16:9 width inside a 1080 by 1920 frame (with blur-fill or bars) shrinks the sharp picture to 1080 by 608 pixels, which is 31.6 percent of the screen height.
- Plain FFmpeg can pan a crop window with a time expression (
t), jump between speakers at a timestamp, blur-fill, pad with bars or stack halves, but it cannot automatically track a moving face. Use Premiere Pro's Auto Reframe Sequence or Final Cut Pro's Smart Conform (or manual keyframes) when a subject moves unpredictably. - Keep faces, slides and burned-in captions inside the central safe zone: using Meta's Reels ad guidance as a conservative rule, leave 14% (269 px) at the top, 35% (672 px) at the bottom, and 6% (65 px) on each side of a 1080 by 1920 frame.
- Export at 1080 by 1920, H.264 High (
yuv420p), fixed 30 fps, closed GOP (-g 60 -sc_threshold 0 -bf 0), stereo AAC at 48 kHz and 128 kbps, with-movflags +faststartand-use_editlist 0.
Frequently asked questions
Short answers to common questions about turning 16:9 horizontal video into 9:16 vertical Reels.
Can I upload a horizontal video as a Reel?
Yes, in the apps, though it will not fill a phone screen. Meta's June 2025 announcement and Facebook Help page state that all videos posted to Facebook are shared as Reels regardless of length or orientation, and Instagram's API reference accepts aspect ratios from 0.01:1 to 10:1 while recommending 9:16. By contrast, Meta's Reels Publishing API for Facebook Pages requires a 9:16 aspect ratio and returns error 1363040 if you send a 16:9 file. Even when an app accepts a 16:9 upload, it displays as a small strip with bars, so converting before you upload gives you full control.
What size is a 9:16 video?
The standard size for a 9:16 vertical video on Instagram Reels, Facebook Reels, YouTube Shorts and TikTok is 1080 pixels wide by 1920 pixels tall (1080×1920). Any resolution where the width divided by 9 equals the height divided by 16 shares the 9:16 aspect ratio, including 720×1280 (HD vertical), 540×960 (the minimum resolution accepted by Meta's Facebook Reels Publishing API) and 2160×3840 (4K vertical). Exporting at 1080×1920 with square pixels (sample aspect ratio 1:1) matches Meta's recommended specification for both Facebook and Instagram without making the file unnecessarily large.
How do I convert 16:9 to 9:16 for free?
You can convert 16:9 to 9:16 for free with FFmpeg on Windows, Mac or Linux, or inside a free desktop editor such as DaVinci Resolve. For a centred speaker, run FFmpeg with -vf "crop=ih*9/16:ih,scale=1080:1920:flags=lanczos,setsar=1" to cut the middle 9:16 strip and scale it to 1080×1920. To keep the full width without cropping, use -vf "scale=1080:1920:force_original_aspect_ratio=decrease,pad=1080:1920:(ow-iw)/2:(oh-ih)/2:color=0x101820,setsar=1" to place the 16:9 clip between dark top and bottom bars. In DaVinci Resolve's free edition, set your timeline resolution to 1080×1920 and keyframe the horizontal X position by hand.
Will cropping to vertical reduce quality?
Cropping a 16:9 video to 9:16 reduces sharpness only when the cropped strip is narrower than 1080 pixels and has to be scaled up. In 4:2:0 video, a full-height 9:16 crop from 1920×1080 is 608×1080 pixels, so filling a 1080×1920 frame requires a 1.78 times upscale. A crop from 1280×720 is only 404×720 pixels and requires a 2.67 times upscale, which looks noticeably soft. If you record in 4K (3840×2160), the 9:16 crop is 1214×2160 pixels, which is wider than 1080×1920 and downscales by 0.89 times with zero upscale quality loss.
What is the best app to convert horizontal video to vertical?
The right tool depends on whether your subject moves across the frame. For batch conversions, static crops, blurred fills, solid bars or stacked split screens, FFmpeg is free, scriptable and leaves no watermark. When a speaker walks around and you want automatic subject tracking, Adobe Premiere Pro (Auto Reframe Sequence) and Apple Final Cut Pro for Mac (Smart Conform) both document built-in 9:16 tracking workflows. For free manual keyframing on a timeline, DaVinci Resolve works on Windows, Mac and Linux. Mobile apps such as CapCut and Edits by Instagram suit quick single-clip edits on a phone.
How do I make a horizontal video vertical without cropping it?
To make a horizontal video vertical without cropping off the left and right edges, scale the 16:9 video down to 1080 pixels wide so it measures 1080×608 pixels, and place it in the middle of a 1080×1920 vertical frame. You then have two ways to fill the 656 pixels of empty space above and below the video: pad the canvas with solid dark or brand-coloured bars where you can place a title and burned-in captions, or layer the clip over a scaled-up, heavily blurred copy of the same video (gblur=sigma=40 in FFmpeg).
Sources and how this was checked
Last checked: 17 October 2026. We ran every FFmpeg command in this guide with FFmpeg and ffprobe 6.1.1 (6.1.1-3ubuntu5) on 16 October 2026 and re-ran the full set on 17 October 2026 on generated H.264 yuv420p test clips at 1280×720, 1920×1080, 2560×1440 and 3840×2160, then inspected the output streams and top-level MP4 boxes (ftyp, moov, mdat, edts). We also checked the official documentation below on 16 and 17 October 2026.
FFmpeg and encoding documentation
- FFmpeg Filters Documentation (
crop,scale,pad,gblur,overlay,vstack,setsar,subtitlesandass) - FFmpeg H.264 Video Encoding Guide (
-crf,-preset,-profile:v,-pix_fmt yuv420pand-movflags +faststart)
Video editors and reframing tools
- Adobe Premiere Pro: Auto Reframe sequences
- Apple Final Cut Pro for Mac: Adjust framing with Smart Conform
- Edits by Instagram: Instagram for Creators: Edits and Instagram Help Center: About Edits
Meta specifications, safe zones and announcements
- Meta Business Help Center: About text overlays and the safe zone for ads in Stories and Reels (used as conservative design guidance; not an organic Reels rule)
- Meta for Developers: IG User Media reference (
POST /{ig-user-id}/media) - Meta for Developers: Reels Publishing API for Pages
- Facebook videos as Reels: Meta newsroom, 17 June 2025 and Facebook Help Center
What we could not confirm
- How strictly Meta's servers enforce "no edit lists" and "moov atom at the front". Both appear in Meta's Instagram Reel specification table, and a default FFmpeg encode violates both unless you pass
-movflags +faststart -use_editlist 0. Meta publishes no public note on whether violating either item causes an immediate rejection or extra server re-encoding, so only a test publish proves how a given file behaves. - How the Instagram and Facebook mobile apps display a raw 16:9 file uploaded today. We did not upload a non-9:16 test file through a live mobile account on 17 October 2026; we cite only what Meta's help pages and API specifications state.
- Free versus paid status of automatic reframing in DaVinci Resolve and CapCut. Third-party sources conflict on whether a basic Smart Reframe option exists in the free edition of DaVinci Resolve or only in Resolve Studio, and no official CapCut help page we could read confirmed whether CapCut's auto-reframe exports stay free without a watermark.
- Automatic subject-tracking reframe in Edits by Instagram. Instagram's Help Center pages load their body text with scripts, so we could not confirm whether Edits includes automatic subject tracking as of 17 October 2026.
About this guide
This guide was written by the team behind PublishClip and describes our own product as its code and pages stood on 17 October 2026. We re-check our editing and specification guides every six months. If you spot a number or menu label that has changed, let us know.