Add Captions to Reels: Auto, Manual and Burned-In
You can add captions to Reels in three ways: turn on the platform's own auto captions inside Instagram or Facebook, upload a timed text file where the platform allows it, or burn the words directly into the video pixels before you upload. People use the word "captions" for two different things on social video, so let us separate them right away. This guide is about on-screen captions, the timed subtitles that show what is being said and heard while the video plays. If you want rules for the post caption, the block of text and hashtags that sits below the video player, see our guides to cross-posting Reels to Facebook and Instagram and Instagram Reels size and specs.
Which of the three captioning methods you should pick depends on how you publish. When you post live from your phone inside the Instagram or Facebook app, the built-in caption sticker or auto-caption toggle is fast and free. When you schedule Reels through a publishing tool, or when you want the exact same font, placement and line breaks on every network, you have to burn captions into the video file itself. Neither Meta's Instagram Reels API nor its Facebook Reels API documents a parameter for uploading a separate subtitle track.
Last checked: 17 October 2026. We verified every API reference, accessibility standard, style rule and FFmpeg command on that date.
On this page
- Add captions to Reels: three ways and when to use each
- Why captions matter, and the statistic to stop quoting
- Method 1: Instagram's captions sticker and the Edits app
- Method 2: captions for Facebook Reels
- Method 3: burn captions into the video
- Style and timing rules that make captions readable
- Where to place captions on a 9:16 frame
- Accuracy checklist: fix names, numbers and sound cues
- Adding a second language to your Reels
- On-screen captions versus the post caption
- A ten-minute captioning workflow
- Key takeaways
- Frequently asked questions
- Sources and how this was checked
Add captions to Reels: three ways and when to use each
Before you open an editor, decide whether your captions should live as a separate text layer controlled by the app or as pixels baked into the MP4 file. In broadcast and web video, these two approaches are called closed captions and open captions. Closed captions can be switched on or off by the viewer and restyled by the player. Open captions are drawn onto the video frames during export, so every viewer sees them regardless of app settings, device language or publishing route.
To add captions to Reels without wasting time on a method that breaks at publish time, start with this three-way breakdown:
- Use the platform's auto captions. You record or upload the video in the Instagram app, the Edits app, or the Facebook app, let speech-to-text generate the words, and fix typos on your phone screen before tapping Share.
- Upload a caption file where it is offered. SubRip (
.srt) files work on standard Facebook Page videos in Meta Business Suite, but neither Instagram Reels nor the Reels publishing APIs give you an SRT upload slot. - Burn captions into the video. You transcribe the audio in an editor, a browser studio or a command-line workflow, check the timing and line breaks, and render a finished 9:16 MP4 with the text drawn on the frames.
| Method | Effort | Style control | Accuracy | Works for scheduled API posts | How it looks to viewers |
|---|---|---|---|---|---|
| Platform auto captions (Instagram sticker or Facebook auto captions) | Low (1 to 3 minutes on phone) | Limited to the app's preset fonts and colours | Fair to good; needs manual word fixes before posting | No. APIs have no sticker or subtitle track field | Native app sticker or player toggle; viewer settings may hide it |
| Uploaded caption file (`.srt`) | Medium (export timed text and match language tag) | None; player picks the font, size and box | High, because you edit the plain-text file first | No. Not documented in either Reels publishing API | Standard closed-caption bar controlled by the viewer's device |
| Burned-in captions (open captions in MP4) | Medium (5 to 10 minutes with a preset) | Complete control over font, size, outline and safe margins | High, because you proofread before rendering | Yes. Every scheduler and API preserves video pixels | Identical on every phone, app version and cross-posted surface |
Closed captions versus open captions on short vertical video
On a television or a desktop web player, closed captions are almost always the better choice. They sit in a sidecar file, let the viewer pick their preferred text size and background opacity, and stay out of the way when someone turns them off. Short vertical video changes that trade-off for two practical reasons.
First, vertical feeds move fast and mix two kinds of text on the same screen. The app draws your account handle, the post description, the audio ticker and the like, comment and share buttons across the lower third of the 9:16 frame. When a platform renders closed captions in its default bottom position, those captions often collide with the app's own interface chrome or jump around when a viewer expands the post description. When you burn captions into the frame yourself, you can lock the baseline at a known height, such as 560 pixels above the bottom edge on a 1080 by 1920 canvas, where neither the speaker's chin nor the app's buttons get in the way.
Second, cross-platform publishing strips platform-specific stickers. If you spend five minutes tidying an Instagram Captions sticker inside the Instagram camera and then want to post the same clip to a Facebook Page, YouTube Shorts or a third-party scheduler, that sticker does not travel as a portable file. If you export the video from Instagram to save the sticker, you risk baking in platform overlays or re-compressing the video twice. Burning captions into your master MP4 once gives you a single clean file that works everywhere you publish.
Why captions matter, and the statistic to stop quoting
You do not need a dubious marketing statistic to justify adding captions to your videos. Captions exist first so that people who are deaf or hard of hearing, and people watching in places where audio cannot be heard, can understand what is being said.
What the accessibility standard actually asks for
The benchmark for web and digital video accessibility is the World Wide Web Consortium's Web Content Accessibility Guidelines (WCAG) 2.2. Understanding Success Criterion 1.2.2: Captions (Prerecorded), checked on 17 October 2026, sets the rule at Level A, the foundational tier of accessibility compliance:
"Captions are provided for all prerecorded audio content in synchronized media, except when the media is a media alternative for text and is clearly labeled as such."
Reading that criterion closely reveals two details that social media auto-caption tools almost always miss. WCAG 1.2.2 states that captions are not merely a transcript of spoken words. To convey the full meaning of the audio track, captions must also:
- Identify who is speaking, especially when there is more than one person in the clip or when a voice comes from off screen.
- Include meaningful non-speech sounds, such as laughter, a door slamming, a timer beeping, music that sets an ironic mood, or an intentional awkward silence.
When a creator relies solely on raw speech-to-text output, a viewer watching without sound sees a stream of unpunctuated words with no clue that the speaker changed mid-sentence or that a statement was followed by a loud buzzer indicating a wrong answer. Adding a short [Host:] label or a [timer dings] cue takes five seconds and turns a confusing transcript into real captions.
The truth about the "85 percent watched without sound" claim
Open almost any blog post about video subtitles and you will see the same sentence repeated as hard science: "85 percent of social media videos are watched on mute." Look up where that number came from before you put it in a client deck or a strategy document.
The figure originates from a Digiday article published on 17 May 2016 about autoplay video in the 2016 Facebook News Feed. At the time, Facebook autoplayed feed videos silently by default until a user tapped them. Digiday asked several digital publishers and a media agency what share of their Facebook video views happened without sound. The article reported self-reported figures from those companies: LittleThings said 85 percent of its video views were silent, Mic said 85 percent of its 30-second views were silent, PopSugar gave a range of 50 to 80 percent, and the agency MEC estimated 85 to 90 percent across its clients' branded videos.
Those numbers were never an audited, platform-wide study by Meta, and they did not measure Instagram Reels, which launched four years later as a sound-on format. Repeating a 2016 publisher estimate from the silent-autoplay News Feed era as if it were a 2026 Instagram Reels rule is bad research. The same caution applies to another oft-repeated claim that "80 percent of people who use subtitles are not deaf." That figure traces back to a 2006 UK television regulator (Ofcom) research report on broadcast television subtitling, not mobile social feeds; never cite it without naming its 2006 broadcast context.
You do not need invented or decade-old numbers to know why you should add captions to Reels. Anyone who watches a phone on a train, in a waiting room, next to a sleeping child, or in a second language benefits from clear on-screen text, and deaf and hard-of-hearing viewers are shut out without it.
Method 1: Instagram's captions sticker and the Edits app
When you create and publish a Reel directly inside the Instagram mobile app, you have two native Meta tools at your disposal: the in-app Captions sticker inside Instagram, and Meta's standalone mobile editing app, Edits by Instagram.
Using the Captions sticker inside the Instagram app
Instagram's built-in speech-to-text tool sits in the sticker tray during Reel creation. Menu labels and button positions in the Instagram camera move around across app updates and account tests, so follow the labels on your phone screen rather than expecting every icon to stay in the exact same corner.
- Open the Instagram app, tap the create button, and choose Reel.
- Record your clip in the camera or pick a vertical video from your phone's camera roll, then proceed to the editing and preview screen.
- Tap the Stickers icon (the squared smiley face) or the CC / Captions button in the editing toolbar.
- Select the Captions sticker. Instagram sends the audio track from your clip to its speech-to-text service and takes a few seconds to transcribe the words.
- While the transcription preview is open, tap through the generated words to fix misheard names, industry terms and punctuation before confirming.
- Choose one of the preset text animations and font styles along the bottom of the screen, and pick a colour or background contrast style that stays legible over your footage.
- Drag the caption block with one finger so it sits well above the bottom caption and audio overlay area, and below any on-screen title hook at the top.
- Finish your post details and tap Share (or schedule the Reel inside the app if your account supports in-app scheduling).
Limits of the Instagram Captions sticker
Before you build a daily workflow around the in-app sticker, watch out for four practical limitations:
- Language and country availability. Instagram's auto captions do not support every language or dialect, and Meta adds or adjusts supported languages over time without publishing a single permanent table. Do not rely on fixed lists copied from third-party blogs; open the sticker in your own app and check the language selector on your account.
- No post-publish sticker editing. Creators consistently report that once a Reel is published with the Captions sticker, you cannot open the post and edit a typo inside the on-screen sticker the way you can edit the text caption underneath the post. If you spot a misspelled client name on the video after publishing, you have to delete the Reel, fix the caption and post again.
- Pinch-to-zoom resizing traps. If you pinch the Captions sticker to resize or rotate it on the preview canvas, it is easy to push lines too close to the right-hand column of engagement buttons (like, comment, share, save) or into the bottom description zone.
- In-app only. The sticker exists inside Instagram's own mobile creation flow. It cannot be triggered by an external scheduling tool publishing via the Instagram Graph API.
Using Edits by Instagram for cleaner caption control
On 22 April 2025, Meta announced Edits, its standalone video creation app, documented on the Edits creators page and in Instagram Help: About Edits. As of 17 October 2026, Edits is free to download on iOS and Android and is built specifically for short-form video creators who want a timeline editor on their phone without third-party watermarks.
Why use Edits instead of the standard Instagram camera sticker when you add captions to Reels?
- Timeline-level review. Instead of tapping through a cramped sticker preview right before posting, you can generate automatic captions on a proper multi-track timeline, scrub frame by frame, and see exactly where each caption block starts and ends against your cuts.
- No-watermark export. Third-party reviews and Instagram's creator pages note that Edits exports clean video files without slapping a branding watermark onto the corner of your frame. That means you can caption a Reel in Edits, export the MP4 to your camera roll, and upload that same file to Facebook Reels or a desktop scheduler.
- Bilingual and animated options. Reviews in mid-2026 reported that Edits added bilingual caption support in July 2026 and expanded its preset caption animations earlier in 2026. Because Meta rolls features out by region and app version, check the caption track options inside your current copy of Edits before planning a bilingual series around it.
Method 2: captions for Facebook Reels
Facebook Reels have their own viewer controls and creation settings, and they behave differently from long-form Facebook Page videos. If you cross-post between Instagram and Facebook, understanding how Facebook treats captions prevents surprise double subtitles or missing text.
Auto-generated captions on Facebook Reels
When you upload a Reel in the Facebook mobile app or through Meta's native creation tools, Facebook can generate automatic closed captions from your audio track. Both the creator and the viewer have a say in whether those captions appear:
- Creator-side toggle. Inside the Facebook Reel settings and post options, you can enable or disable auto-generated captions for the Reel and review the generated transcript where the interface offers edit access.
- Viewer-side settings. Because Facebook's native auto captions are closed captions rather than burned-in pixels, an individual viewer can turn captions on or off in their own Facebook app media settings. If a viewer has turned closed captions off globally in their app, they will not see Facebook's auto-generated caption layer—whereas they will always see captions that you burned into the video file.
Uploading an SRT file to a Facebook Reel
If you manage a Facebook Page in Meta Business Suite on a desktop computer, you may be familiar with uploading a .srt (SubRip) subtitle file to a regular horizontal or vertical video post, named with a locale code such as filename.en_US.srt. That raises a common question: can you upload an .srt file to a Facebook Reel?
As of 17 October 2026, Meta's Reels Publishing API for Pages documents the three-phase upload flow (start, transfer, finish) and lists the supported parameters for publishing a Page Reel (upload_phase, video_id, video_state, description, title, scheduled_publish_time, collaborators). It lists no parameter for attaching an .srt or WebVTT caption file. In consumer and Business Suite flows, creators also report that the SRT file upload option available on traditional Page video editors does not appear on every Reels composer screen, especially since Meta began unifying Facebook videos into Reels in June 2025.
Because SRT upload support on Reels is absent from the publishing API and inconsistent across composer screens, do not build a production workflow that depends on attaching sidecar .srt files to Reels. If you already create an .srt file so you can proofread the text and timestamps in a text editor, take one extra step and burn that .srt into the MP4 before you upload. That takes less than thirty seconds with the FFmpeg recipe in the next section and guarantees that the captions appear on both Facebook and Instagram.
Watch out for the double-caption overlap
One frequent mistake happens when you burn open captions into your MP4 and then leave the platform's own auto-caption sticker or closed-caption toggle switched on at the low-third default position. The viewer sees your crisp burned-in captions in the middle-lower safe zone, and a second set of slightly delayed, unedited platform captions flickering underneath or directly on top of them. Whenever you upload a video that already has burned-in subtitles, leave the in-app Captions sticker off.
Method 3: burn captions into the video
Burning captions into the video—turning your timed text into part of the H.264 video stream itself—is the most reliable way to add captions to Reels. It is the only method that survives every scheduling tool, every cross-posting pipeline, and every viewer setting.
Why scheduled and API-published Reels need burned-in captions
When you use a third-party scheduler or your own script to schedule Instagram Reels or publish to both networks at once, the tool talks to Meta's servers through the official Graph API. Let us look at what those endpoints actually accept, checked on 17 October 2026:
- Instagram Graph API (
POST /{ig-user-id}/media). Meta's IG User Media reference lists every parameter accepted when creating a Reel container (media_type=REELS,video_url,caption,thumb_offset,cover_url,audio_name,share_to_feed,collaborators,location_id,user_tags,product_tags). There is no parameter for enabling the Instagram Captions sticker, and no parameter for uploading an.srtor.vttsubtitle file. Furthermore, the same reference page states explicitly thatalt_textis not supported for Reels and Stories. - Facebook Reels Publishing API (
POST /{page-id}/video_reels). Meta's Reels Publishing API guide likewise provides no parameter for uploading a caption track during thestart,transferorfinishphases.
In plain English: no scheduling tool on earth can press Instagram's in-app Captions sticker for you through the API, because Meta's API does not expose it. If you schedule a raw, uncaptioned video through an API tool expecting Instagram to add styled sticker captions automatically when it goes live, your Reel will publish without them. For developers who want to inspect every field of the container lifecycle, our Instagram Reels API guide walks through all three calls.
The fix is simple: burn the captions into the MP4 before you hand the file to your scheduler. You can do that in a desktop timeline editor (DaVinci Resolve, Premiere Pro, Final Cut Pro, CapCut Desktop), in the Edits app on your phone, in a browser-based editor like PublishClip Studio (where browser-side caption rendering and optional speech-to-text transcription let you edit and burn captions into a 9:16 export), or reproducibly from the command line with FFmpeg.
Step 1: transcribe and correct your .srt file
Whether you use an automatic speech-to-text tool (such as Whisper, a desktop editor's transcription panel, or an online transcriber) or type the lines by hand for a short 15-second clip, save your timed text as a standard SubRip (.srt) file encoded in UTF-8 without a byte-order mark (BOM).
An .srt file is plain text made of numbered blocks. Each block has a sequence number, a start and end timestamp in hours:minutes:seconds,milliseconds (00:00:01,200 --> 00:00:03,800), one or two lines of text, and a blank line before the next block:
1
00:00:00,200 --> 00:00:02,600
Most scheduled Reels lose their
in-app caption stickers.

2
00:00:02,700 --> 00:00:05,400
Here is how to burn crisp subtitles
straight into your MP4 file.

3
00:00:05,500 --> 00:00:08,100
Keep each line under 42 characters
and above the bottom 560 pixels.
Open the .srt file in any text editor and read it while listening to the clip once at normal speed. Fix three things right here while they are plain text:
- Proper nouns and numbers. Correct brand names, product SKUs, prices and URLs.
- Line length and line count. Keep every block to at most two lines, and keep every line at or under 42 characters so a 1080-pixel-wide vertical frame never wraps a single line into three.
- Natural phrase breaks. Break two-line blocks after a comma or before a conjunction (
and,but,because) or preposition (into,above,without), never between an article (the,a) and its noun.
Step 2: style it and avoid the FFmpeg SRT sizing gotcha
If you search the web for how to burn an .srt file into a 1080 by 1920 vertical video with FFmpeg's subtitles filter, many tutorials and AI assistants will tell you to pass pixel sizes inside force_style—for example, FontSize=64,MarginV=560 to get 64-pixel text sitting 560 pixels above the bottom of a 1080 by 1920 frame.
We tested that exact command on 17 October 2026 with FFmpeg 6.1.1 and libass, and it drew no visible text on the frame at all.
Why does FontSize=64,MarginV=560 fail on an .srt file? Because when FFmpeg's subtitles filter converts an .srt file internally to Advanced SubStation Alpha (ASS) format for libass to render, it uses the default ASS virtual script resolution of 384 by 288, not your video's pixel resolution of 1080 by 1920. Every font size and margin you pass in force_style on an .srt file is interpreted inside that tiny 384 by 288 coordinate space, and then scaled up to your video height by a factor of 1920 / 288 = 6.6667.
When you pass MarginV=560 on an .srt file, libass multiplies 560 by 6.67 and pushes the subtitle baseline 3,733 pixels above the bottom of the frame—nearly two full screen heights off the top of your 1920-pixel video! And FontSize=64 becomes an enormous 427-pixel-tall font.
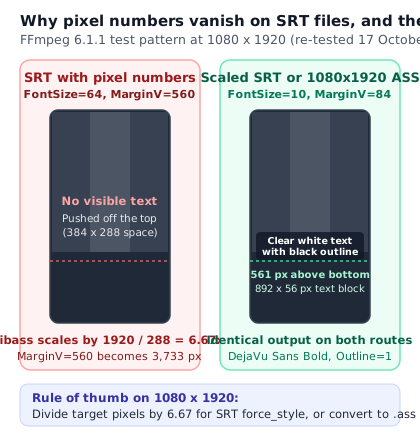
Once you know that libass uses a 384 by 288 script space for .srt files (1920 / 288 = 6.67 vertically, 1080 / 384 = 2.8125 horizontally), you have two clean, tested ways to style your captions:
- Route A (direct
.srtwith scaled numbers). Divide your desired vertical pixel values by 6.67. To get roughly a 64-to-67-pixel font and a 560-pixel bottom margin on a 1080 by 1920 frame, useFontSize=10andMarginV=84, withMarginL=10,MarginR=10andOutline=1. - Route B (convert
.srtto.assand use real pixels). Convert the.srtto.ass, setPlayResX: 1080andPlayResY: 1920in the[Script Info]header so coordinates match real video pixels 1:1, and specifyFontsize=64,Outline=5,MarginL=70,MarginR=70, andMarginV=560in theStyle:line.
We tested both routes on a 1080 by 1920 frame with FFmpeg 6.1.1 and DejaVu Sans Bold on 17 October 2026. Both routes rendered identically: a crisp white two-line caption block with a black outline measuring 892 pixels wide by 56 pixels tall, with its lowest pixel sitting 561 pixels above the bottom edge.
Step 3: burn it in and check the output
Here are the exact commands for both routes so you can copy the one that fits your workflow.
Route A: one-command burn-in from captions.srt
Run this command when you have input.mp4 (already 1080 by 1920) and captions.srt in the same folder:
ffmpeg -i input.mp4 \
  -vf "subtitles=captions.srt:force_style='FontName=DejaVu Sans,Bold=1,FontSize=10,PrimaryColour=&H00FFFFFF&,OutlineColour=&H00000000&,BorderStyle=1,Outline=1,Shadow=0,Alignment=2,MarginV=84,MarginL=10,MarginR=10'" \
  -c:v libx264 -profile:v high -pix_fmt yuv420p -r 30 -g 60 \
  -b:v 8M -maxrate 12M -bufsize 24M \
  -c:a aac -ac 2 -ar 48000 -b:a 128k \
  -movflags +faststart \
  output-captioned.mp4
What each part of force_style does:
FontName=DejaVu Sans,Bold=1: selects a clean, wide sans-serif font in bold weight. ReplaceDejaVu SanswithFigtree,Inter,Arialor another sans-serif font installed on your machine.FontSize=10: inlibass's 288-unit-tall script space,10scales by 6.67 to roughly 67 units of nominal height (measuring 56 pixels from the top of capitals to the bottom of descenders in our test).PrimaryColour=&H00FFFFFF&andOutlineColour=&H00000000&: ASS colours use hexadecimal&HAABBGGRR&(alpha, blue, green, red, where00alpha means fully opaque).&H00FFFFFF&is opaque white fill and&H00000000&is opaque black outline.BorderStyle=1,Outline=1,Shadow=0: draws an outline stroke around each letter (BorderStyle=1) with a 1-unit script-space stroke width (about 6.7 pixels on 1080 by 1920) and no drop shadow. If you prefer a semi-transparent dark box behind the whole text block instead of an outline, changeBorderStyle=1toBorderStyle=3and setOutlineColour=&H66000000&.Alignment=2: bottom-center alignment (numpad layout:1is bottom-left,2is bottom-center,3is bottom-right,5is screen-center,8is top-center).MarginV=84,MarginL=10,MarginR=10: places the bottom of the caption block 84 script units (84 * 6.67 = 560pixels) above the bottom edge, with 10 script units of horizontal padding on each side.
Route B: real pixel coordinates with captions.ass
If you want to work in exact 1080 by 1920 pixel numbers—or if you want to highlight individual words or move one specific line higher when a graphic appears at the bottom—convert your .srt file to .ass first:
ffmpeg -i captions.srt captions.ass
Open captions.ass in a text editor and update the [Script Info] and [V4+ Styles] sections so PlayResX is 1080 and PlayResY is 1920:
[Script Info]
ScriptType: v4.00+
PlayResX: 1080
PlayResY: 1920
WrapStyle: 0
ScaledBorderAndShadow: yes

[V4+ Styles]
Format: Name, Fontname, Fontsize, PrimaryColour, SecondaryColour, OutlineColour, BackColour, Bold, Italic, Underline, StrikeOut, ScaleX, ScaleY, Spacing, Angle, BorderStyle, Outline, Shadow, Alignment, MarginL, MarginR, MarginV, Encoding
Style: Default,DejaVu Sans,64,&H00FFFFFF,&H000000FF,&H00000000,&H00000000,-1,0,0,0,100,100,0,0,1,5,0,2,70,70,560,1
Notice that in .ass style lines, -1 means true for Bold, 64 is 64 real pixels, 5 is a 5-pixel black outline, 2 is bottom-center alignment, 70,70 are 70-pixel left and right margins, and 560 is a 560-pixel bottom margin. Then burn captions.ass into your video:
ffmpeg -i input.mp4 \
  -vf "ass=captions.ass" \
  -c:v libx264 -profile:v high -pix_fmt yuv420p -r 30 -g 60 \
  -b:v 8M -maxrate 12M -bufsize 24M \
  -c:a aac -ac 2 -ar 48000 -b:a 128k \
  -movflags +faststart \
  output-captioned.mp4
If your source video is horizontal (16:9) rather than 9:16, convert and crop or pad it to 1080 by 1920 before applying the subtitle filter so the text is sized for the vertical canvas, not the horizontal one. Our guide to converting horizontal video to vertical covers the exact filter chains for center-cropping, blurred-background padding and split-screen layouts.
Before you upload output-captioned.mp4, export one still frame at a spoken timestamp to verify that the font rendered cleanly and sits in the safe zone:
ffmpeg -ss 00:00:03 -i output-captioned.mp4 -frames:v 1 check-frame.png
Open check-frame.png and confirm that both lines are readable, no words are clipped at the sides, and the bottom line sits well clear of the lower third.
Style and timing rules that make captions readable
Adding words to a frame is only half the job. If the lines flash by too fast, split phrases in awkward places, or blend into a bright shirt in the background, viewers stop reading after two seconds. Rather than guessing at line lengths and reading speeds, borrow the rules tested across millions of hours of viewing in broadcast and streaming television.
Line length, line count and reading speed from the Netflix style guide
The Netflix English Timed Text Style Guide, checked on 17 October 2026, publishes concrete numbers for English subtitles that translate well to vertical video when you add captions to Reels:
- Maximum 42 characters per line. Including spaces and punctuation, a single line should never exceed 42 characters. On a narrow 9:16 phone screen where your font has to be large enough to read at arm's length, 32 to 38 characters per line is often even more comfortable, and 42 is a hard ceiling.
- Maximum two lines per caption block. Never stack three or four lines on screen at once. Three lines force the viewer's eyes to scan a tall paragraph while the video keeps moving behind it, and on a vertical Reel a three-line block either covers the speaker's mouth or dips into the bottom interface buttons.
- Reading speed up to 20 characters per second for adults (17 for children). Count the characters in your caption block (including spaces) and divide by the number of seconds the block stays on screen. For adult audiences, keep the pace at or below 20 characters per second; for children's content, stay at or below 17 characters per second. For example, a two-line block holding 60 characters needs at least 3.0 seconds on screen (
60 / 20 = 3.0) so an adult viewer can read it and still look at the video. - Minimum and maximum duration. Keep a caption block on screen for at least five-sixths of a second (about 833 milliseconds, or 25 frames at 30 frames per second) so it does not flash like a subliminal frame, and no longer than 7 seconds even if a sentence drags on. If a speaker talks non-stop at 200 words per minute, condense filler words ("um", "you know", "basically") or split the thought into shorter blocks rather than exceeding 20 characters per second.
Where to break lines so phrases read naturally
A two-line caption reads twice as fast when each line forms a complete grammatical unit. Follow the Netflix timed-text line-break rules whenever you split a sentence across two lines:
- Break after punctuation. If a sentence has a comma, semicolon, colon or dash near the middle, break the line right after that punctuation mark.
- Break before conjunctions and prepositions. When there is no punctuation mark, start the second line with the conjunction (
and,but,or,because,while) or the preposition (in,on,from,with,before,after). - Keep articles, adjectives and nouns together. Never leave
a,an,the,myorthishanging at the end of line one with its noun at the start of line two. - Keep first and last names together. Do not put a person's first name at the end of line one and their surname at the start of line two unless the full name itself exceeds the line limit.
- Keep auxiliary verbs with their main verb. Do not split
have been,will beoris goingacross two lines.
| Rule | Hard-to-read break (avoid) | Clean phrase break (use this) |
|---|---|---|
| Article and noun | Upload the | Upload the video file |
| Preposition phrase | Schedule your Reel in | Schedule your Reel |
| Conjunction | Check the audio levels and | Check the audio levels |
| First and last name | Interview hosted by Alex | Interview hosted by Alex Rivera |
Colour contrast, font choice and outlines
Video backgrounds never sit still. Over a 30-second Reel, the pixels behind your captions can shift from a dark studio wall to a bright white window or a yellow product box. Plain white letters without an outline or background box vanish the moment they cross a light area.
The accessibility rule for text legibility is W3C WCAG 2.2 Understanding Success Criterion 1.4.3: Contrast (Minimum), Level AA, checked on 17 October 2026. It requires:
- At least a 4.5:1 contrast ratio between text and its background for normal-sized text.
- At least a 3:1 contrast ratio for large-scale text (defined in WCAG as at least 18 point, or 14 point bold—roughly 24 pixels regular or 18.5 pixels bold on a standard display).
Because you cannot guarantee that every video frame behind your letters stays dark enough to hold a 4.5:1 ratio against white text, your caption style must carry its own dark backing. You have two dependable ways to guarantee contrast on every frame when you add captions to Reels:
- White text (
#FFFFFF) with a thick black outline (#000000, 4 to 6 pixels wide on a 1080 by 1920 frame). Pure white against pure black has the maximum possible luminance contrast ratio of 21:1, well above the 4.5:1 and 3:1 thresholds, while letting the video remain visible between lines and around the words. - White or high-contrast yellow (
#FFF200) text inside a dark translucent pill or box (#000000at 65 to 80 percent opacity). A dark background box makes multi-word lines effortless to read over busy B-roll, screen recordings or text-heavy backgrounds.
For typography, pick a sturdy, open sans-serif typeface in bold or semi-bold weight—such as Figtree, Inter, DejaVu Sans, Roboto, Helvetica Neue or Montserrat. Avoid thin weights, condensed display fonts, script fonts and all-italic blocks; fine strokes shimmer and break up when social platforms re-compress your video for mobile connections.
Word-by-word ("karaoke") highlights versus two-line blocks
Many social media captioning apps default to flashing one to three words at the center of the screen with a bouncing colour highlight on the active word. Should you use that style or standard two-line subtitle blocks?
Treat word-by-word karaoke captions as an aesthetic choice, not an accessibility improvement. Fast single-word flashing forces the viewer's eyes to fixate on one spot and wait for each word to appear, removing the ability to scan a phrase ahead or re-read a missed number. For rapid-fire entertainment hooks or 10-second talking-head promos, single-word highlights can add visual energy. For tutorials, product walkthroughs, interviews, recipes and any clip where the viewer needs to absorb instructions or numbers, two-line phrase-broken captions at up to 42 characters per line are much easier to read.
Where to place captions on a 9:16 frame
A 9:16 Reel frame is 1080 pixels wide by 1920 pixels tall, but you do not own the whole canvas. Both Instagram and Facebook draw their player interface directly on top of your video. Place your captions where the app draws buttons or text and your subtitles become unreadable.
The bottom 28 to 35 percent is off limits
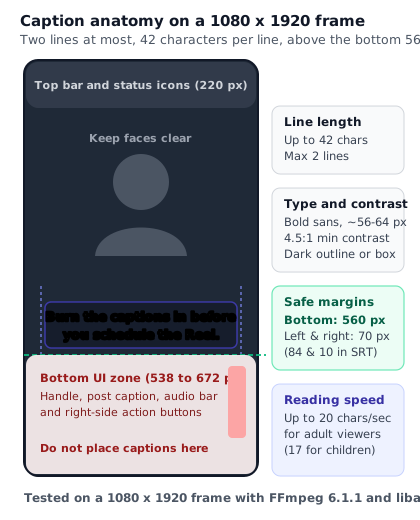
At the bottom of every Reel player sit the creator's profile picture and handle, the Follow button, the first line or two of the post caption, the scrolling audio ticker, and (on some surfaces) a comment prompt or shop pill. Along the lower-right edge sit the vertical stack of icons for Like, Comment, Share, Save and the audio thumbnail.
Meta's Business Help Center guide on text overlays and safe zones for Stories and Reels ads advises keeping roughly the bottom 35 percent of a 9:16 vertical ad free of text, logos and key creative elements (along with about 14 percent at the top). While that page is written as ads guidance rather than an organic Reels rule, the organic Reels player uses the same screen real estate across phones of different aspect ratios.
On a standard 1080 by 1920 canvas, here is what those percentages mean in real pixels:
- Bottom 28 to 35 percent: 538 to 672 pixels from the bottom edge. Setting your subtitle bottom margin (
MarginVin ASS) to 560 pixels places the lowest pixel of your bottom caption line right inside that safe boundary—high enough to clear the account name, two lines of collapsed post description and the audio ticker, yet low enough to stay under a centered speaker's chin and collarbones. - Top 12 to 14 percent: 220 to 270 pixels from the top edge. Reserve this strip for the phone's system status bar, the Reels header and camera icons.
- Left and right edges: keep at least 70 pixels of margin on the left and right (
MarginL=70, MarginR=70on 1080 by 1920) so tall phones that slightly crop the sides to fit a 19.5:9 or 20:9 screen never slice off the first or last letter of a line. If a caption block sits low enough to approach the right-hand icon column, widen the right margin to 140 pixels or keep lines short and centered.
Do not cover faces, hands or product close-ups
Locking your default caption baseline at 560 pixels from the bottom works for 90 percent of talking-head and B-roll shots. What about the remaining 10 percent—when you cut to a close-up of a circuit board, a pan on a stove, or a software button that happens to sit in the lower-middle of the frame?
Never let captions cover the exact object the speaker is pointing at, and never park a caption box across a speaker's eyes or mouth. When one specific shot has crucial detail at the 560-pixel line, move that single caption block up to the upper-middle safe zone (for example, around 320 pixels below the top edge) for the duration of that cut, then return to your standard baseline on the next cut. In an .ass subtitle file with PlayResX: 1080 and PlayResY: 1920, you can override the position of a single dialogue line by adding {\an8\pos(540,320)} at the start of that line's text.
Also check how your burned-in captions interact with your thumbnail. If you pick a frame from your video as the Reel cover rather than uploading a separate image, a half-finished subtitle line can get cropped awkwardly in the 3:4 profile grid view. See our guide to Instagram Reel covers and safe zones to keep your grid clean.
Accuracy checklist: fix names, numbers and sound cues
Modern speech-to-text models are fast, but they guess by sound, not by knowing your business. An unedited auto-caption track that turns your product name into a random noun or drops the word "not" from a safety warning makes a professional video look careless. Run every transcript through this six-point proofreading checklist before you burn or publish it.
1. Proper nouns, brand names and handles
Speech-to-text models routinely mangle startup names, uncommon surnames, street names and social handles. Check the capitalization and spelling of every company name (PublishClip, FFmpeg, libass, Meta Business Suite), person's name and @handle. If you mention a website address out loud, format it cleanly on screen (publishclip.com) rather than writing out "publish clip dot com".
2. Numbers, prices, dates and units
A single misheard digit changes the meaning of a sentence completely:
- "15" versus "50", "13" versus "30", "14" versus "40". Fast speech blurs
-teenand-tyendings. Listen closely whenever a price, percentage or time window is spoken. - Currencies and units. Write
$49.99,1080 x 1920,48 kHz,128 kbpsand30 fpsin compact numerals and symbols rather than spelling out"one thousand and eighty by one thousand nine hundred and twenty". Numerals are much faster to scan on a phone screen and save valuable characters toward your 42-character line cap. - Negations. Double-check
"can"versus"can't","do"versus"don't", and"is"versus"isn't". Background noise or a quick breath often causes speech-to-text to drop a contraction's ending and reverse your advice.
3. Technical jargon and homophones
Every niche has homophones that trip up general-purpose transcription models:
- In video editing and development:
codec(often transcribed as"code deck"),bitrate("bit rate"or"bite rate"),SRT("sort"),H.264("age two six four"),keyframes("key frames"),API("A P I"),JSON("Jason"),cron("crown"). - In fitness, cooking, finance or law: check anatomical terms, ingredient names, ticker symbols and statutes.
Keep a short personal glossary of the ten terms your speech-to-text tool always gets wrong, and run a quick find-and-replace over your .srt file before rendering.
4. Speaker identification when voices change
Remember WCAG 2.2 Success Criterion 1.2.2: captions must identify who is speaking when there are multiple speakers or off-screen voices. You have three clean ways to mark speaker changes on a Reel:
- Dash prefix on a two-speaker exchange: when two people speak inside the same short block or back to back, prefix each speaker's line with a hyphen and a space (
- Ready to test it?/- Let's run the command.). - Bracketed or colon labels: when an interviewer asks a question from behind the camera, start the first line with
[Interviewer]orHost:so the viewer immediately knows why the person on screen is nodding instead of moving their lips. - Distinct text colour for a second speaker: in burned-in
.asssubtitles, you can keep the main host in white (#FFFFFF) and put the second speaker in soft cyan (#A5F3FC) or warm yellow (#FEF08A) inside a dark box.
5. Meaningful non-speech sounds and music cues
If the punchline or lesson of your Reel depends on a sound effect, caption the sound in square brackets using lowercase descriptive words:
[phone buzzes][espresso grinder whirs][silence][upbeat synth music stops abruptly]
Only caption non-speech sounds that carry meaning. Do not clutter the screen with [background music playing] on every single block when a quiet instrumental loop runs underneath a normal tutorial.
6. Profanity, slang and auto-censorship quirks
Platform auto-caption tools often mask words that sound like profanity with asterisks (***) or substitute bizarre rhyming words—even when you said an innocent word in a noisy room. Conversely, if your audio uses mild slang, verify that the caption displays what was actually said or a clean, intentional abbreviation rather than a nonsensical machine guess.
Adding a second language to your Reels
If your audience spans two languages—for example, a local business serving a bilingual city, or a creator teaching in English to a large Spanish-, French- or Hindi-speaking following—captions are the fastest way to bridge both groups without dubbing a new audio track.
Three ways to handle bilingual captions on Reels
Depending on how crowded your frame is and where your audience watches, pick one of these three setups:
- One language per line (two-line stacked bilingual captions). Put the spoken language on line one and the translation on line two inside the same caption block, keeping each line at or under 42 characters. Give the second line a slightly softer colour (such as light grey
#E5E7EBor warm yellow#FDE047with a black outline) so a viewer's eye locks onto their language immediately without reading both lines by mistake. Never use two lines of English plus two lines of translation at once; four lines on a 9:16 screen turns the video into a wall of text. - Use Edits by Instagram's bilingual caption tools. As noted under Method 1, third-party reviews reported in July 2026 that Meta's free Edits app added bilingual caption options. If you edit on your phone, check the caption settings in your current build of Edits to see which language pairs are active in your country.
- Export two separate MP4 files from one project. When both languages require two lines per thought (common when translating compact English phrases into longer Romance-language or German clauses), keep two separate
.srtfiles—captions.en.srtandcaptions.es.srt—and run the FFmpeg burn-in command twice to produce two clean MP4 files. That respects the two-line ceiling in both languages and lets you post each version to the account or audience segment where that language performs best.
Why machine translation needs a human pass
Never pipe raw speech-to-text output straight into a machine translator and burn the result into a video without someone who speaks the target language reading it. Short-form video is full of idioms ("let's break this down", "out of the box", "drop a link"), imperative UI verbs ("Tap Share", "Open Settings", "Switch to a Page"), and informal pronouns (tu versus usted or vous). A literal word-for-word translation of UI buttons won't match what a user actually sees on their localized phone screen. Always match the exact menu labels used by Instagram and Facebook in that language.
On-screen captions versus the post caption
Because people use the word "caption" for both the subtitles inside the video and the text description underneath the video, it helps to treat them as two halves of one system. Each half does a job the other cannot do.
| Feature | On-screen captions (in the video) | Post caption (below the video) |
|---|---|---|
| Primary job | Convey spoken words, speaker changes and key sounds in real time | Provide context, scannable steps, hashtags and next-step instructions |
| Length limit | Up to 42 characters per line, 2 lines per block, paced at up to 20 chars/sec | Instagram: up to 2,200 characters and up to 5 hashtags. Facebook: no cap stated in Reels API guide |
| Editable after posting | No, when burned in (and reported as not editable on Instagram's sticker) | Yes, on live posts in the app or Business Suite |
| Selectable or copyable by viewer | No. Viewers cannot copy a promo code or command from video pixels | Limited on mobile, but stays visible without pausing the video |
| Screen-reader accessible | No, when burned into video pixels (and `alt_text` is unsupported on Reels) | Yes. Screen readers can read the post caption text aloud |
Current limits on the post caption below the Reel
When you write the text caption that accompanies your captioned Reel, keep the current platform limits in mind, checked on 17 October 2026:
- Instagram caption length: Meta's IG User Media API reference states a maximum of 2,200 characters and up to 30
@mentions in thecaptionfield. - Instagram hashtag limit: Since 18 December 2025, Instagram has rolled out a 5-hashtag limit per post or Reel, documented on Instagram's hashtags help page and reported by Social Media Today. Pick up to five specific hashtags that describe the topic rather than pasting a block of thirty tags.
- Facebook Reel description: Meta's Reels Publishing API for Pages accepts a
descriptionstring on thefinishcall and states no character or hashtag cap on that page. Keep the first sentence clear and direct so viewers do not have to tap "See more" just to understand what the video is about.
Put key facts in both places for full accessibility
Remember that burned-in captions are pixels inside a video stream: a deaf or hard-of-hearing viewer can read them on screen, and a sighted viewer on a noisy train can read them, but a blind viewer using a screen reader (VoiceOver on iOS or TalkBack on Android) cannot read pixels baked into an MP4. And as noted earlier, Meta's Instagram Graph API reference explicitly states that alt_text is not supported for Reels.
Because of that, whenever your Reel shows a critical fact solely on screen—such as a discount code, a street address, a recipe measurement, or a three-step troubleshooting order—include a concise summary of those same facts in the text post caption underneath the Reel as well. Doing both means your video works for viewers who cannot hear the audio, viewers who cannot see the screen, and viewers who pause the video to read the steps at their own pace.
A ten-minute captioning workflow
Once you set up your subtitle template or save the FFmpeg command in a shell script, it should take no more than ten minutes to add captions to Reels from a finished video edit. Use this repeatable checklist for every clip before you schedule or cross-post it:
- Minute 0 to 2: export a clean 9:16 master without platform watermarks. Confirm your video is 1080 by 1920, 30 frames per second, H.264 with stereo AAC audio, and between 3 and 90 seconds if it will go to both Facebook and Instagram. Need the exact encoding settings? Check our guides to Instagram Reels size and specs and Facebook Reels size and specs.
- Minute 2 to 4: generate a timed transcript (
.srt). Run speech-to-text in your editor, in PublishClip Studio, or with a local Whisper / transcription tool, and exportcaptions.srt. - Minute 4 to 7: proofread and break lines in a text editor. Play the clip once while reading
captions.srt. Fix names, numbers, negations and jargon. Split any line over 42 characters, keep every block to at most two lines, break before conjunctions and prepositions, and add[speaker]or[sound]cues where needed. - Minute 7 to 8: burn the captions into the MP4. Run the tested FFmpeg command (
FontSize=10,MarginV=84on.srt, orPlayResX: 1080, PlayResY: 1920withFontsize=64, MarginV=560on.ass) or render the captioned 9:16 video from your timeline editor or browser studio. - Minute 8 to 9: inspect a check frame at phone size. Open the exported MP4 on your phone or extract a still frame with
ffmpeg -ss 00:00:03 -i output-captioned.mp4 -frames:v 1 check-frame.png. Verify that the lowest caption line clears the bottom 560 pixels, no text covers the speaker's face or key visual action, and the outline holds 4.5:1+ contrast over the brightest frame. - Minute 9 to 10: write the post caption and schedule. Write your post caption (repeating key numbers or steps in the text, with at most 5 hashtags on Instagram), leave the in-app auto-caption sticker switched off so you do not get double captions, and queue the Reel. If you are setting up your accounts for the first time or troubleshooting a stuck upload, see our guides on connecting Instagram to a Facebook Page, fixing an Instagram Reel that is not uploading, and repurposing one video across platforms.
Key takeaways
- You can add captions to Reels in three ways: platform auto captions (Instagram's Captions sticker, Edits or Facebook auto captions), uploaded caption files (not supported in either Reels API), or burned-in open captions rendered into the MP4.
- Neither Meta's Instagram Reels API (
POST /{ig-user-id}/media) nor its Facebook Reels API (POST /{page-id}/video_reels) documents a subtitle track or caption-sticker parameter, andalt_textis unsupported for Reels. Scheduled and API-published Reels need burned-in captions. - WCAG 2.2 Success Criterion 1.2.2 (Level A) requires captions for prerecorded synchronized audio, including speaker identification and meaningful non-speech sounds.
- Stop quoting the "85 percent of videos are watched without sound" figure as a general rule: it comes from a May 2016 Digiday article quoting self-reported publisher estimates from Facebook's old silent-autoplay News Feed, never an audited Meta study or a Reels metric.
- Follow the Netflix English Timed Text rules for readability: at most 42 characters per line, at most 2 lines per block, up to 20 characters per second for adults (17 for children), and clean line breaks after punctuation or before conjunctions and prepositions.
- Keep text contrast at or above 4.5:1 (WCAG 2.2 SC 1.4.3 Level AA) by pairing bold white sans-serif text with a dark outline or translucent background box, and keep the caption baseline above the bottom 28 to 35 percent of the frame (560 pixels from the bottom on a 1080 by 1920 canvas).
- When burning an
.srtfile into a 1080 by 1920 video with FFmpeg'ssubtitlesfilter, remember thatlibassinterpretsforce_stylein a 384 by 288 script space (1920 / 288 = 6.67vertical scale): useFontSize=10,MarginV=84on.srt, or convert to.asswithPlayResX: 1080andPlayResY: 1920to use real pixel numbers (Fontsize=64, MarginV=560).
Frequently asked questions
Short answers to common questions when you add captions to Reels.
How do I add captions to a Reel?
You have two main routes depending on how you publish. If you post live from the Instagram app, tap the Stickers icon on the Reel preview screen, choose the Captions sticker, tap through the generated words to fix typos, drag the text above the bottom overlay area, and share. If you schedule Reels through a publishing tool, cross-post one file to multiple networks, or want full control over font and placement, burn open captions directly into your 1080 by 1920 MP4 before uploading using Edits by Instagram, a desktop or browser video editor, or FFmpeg.
Why can I not add captions to my Reel?
If the Captions sticker is missing inside the Instagram app, check three things first: update the Instagram app to the latest version, check whether automatic captions support your account's language and region (availability varies and changes over time), and make sure your clip actually has an audible speech track rather than a muted clip. If you are publishing through a third-party scheduling tool, the sticker is unavailable because Meta's Instagram Graph API and Facebook Reels API have no parameter to trigger in-app caption stickers; burn the captions into the video file before scheduling.
Can I upload an SRT file to Instagram Reels?
No. As of 17 October 2026, neither the Instagram mobile app nor Meta's Instagram Graph API (POST /{ig-user-id}/media) provides a field for uploading a sidecar .srt or .vtt subtitle file to an Instagram Reel, and Meta's Facebook Reels Publishing API for Pages lists no subtitle-file parameter either. Instead of trying to attach an .srt file at upload time, use your .srt file to burn open captions directly into the MP4 with FFmpeg (-vf subtitles=captions.srt with scaled style values, or -vf ass=captions.ass) or a video editor before you upload.
Are auto captions accurate?
Auto captions are a fast starting point, not a finished product. Modern speech-to-text tools handle clear, single-speaker studio audio well, but they regularly mishear brand names, personal names, technical jargon, numbers (15 versus 50), negations (can versus can't) and overlapping voices, and they omit speaker labels and meaningful sound effects required by WCAG 2.2 Success Criterion 1.2.2. Always listen to your Reel once from start to finish while reading the generated captions, fix every proper noun and number, and adjust awkward line breaks before you export or tap Share.
What font and size should Reel captions be?
Use a bold or semi-bold sans-serif font such as Figtree, Inter, DejaVu Sans, Roboto or Montserrat in white (#FFFFFF) with a thick black outline or a dark translucent background box so contrast stays above the WCAG 2.2 minimum of 4.5:1 across bright and dark frames. On a 1080 by 1920 canvas, aim for letters roughly 56 to 64 pixels tall, at most two lines per block and at most 42 characters per line, positioned with at least 70 pixels of side margin and the bottom line sitting around 560 pixels above the bottom edge.
Can scheduled Reels have captions?
Yes, scheduled Reels can have captions, and the way you add them depends on where you schedule. If you schedule a Reel inside the Instagram mobile app, you can apply the in-app Captions sticker before turning on "Schedule this reel". If you schedule through an external tool that publishes via Meta's official APIs—such as PublishClip—you must burn the captions into the MP4 video file before uploading, because neither the Instagram Reels API nor the Facebook Reels API exposes a caption-track or sticker field. Burned-in captions work on every scheduler and every network.
Do captions help a Reel reach more people?
Captions make your Reel understandable to deaf and hard-of-hearing viewers and to anyone watching in a quiet or noisy place where they cannot hear their phone, so fewer people swipe away simply because they cannot follow what is being said. However, as of 17 October 2026, we found no official Meta help page or engineering study stating that adding captions gives a Reel an algorithmic ranking boost in recommendations. Add captions because they make your video accessible and clear to every viewer, not because of unverified claims about algorithm points.
Sources and how this was checked
Last checked: 17 October 2026. We opened each specification, help page and standard below on that date, and we ran the FFmpeg 6.1.1 (libass) commands against a 1080 by 1920 test frame to measure the exact pixel height, width and bottom margin of the rendered captions.
Accessibility and timed-text standards
- W3C WCAG 2.2 Understanding Success Criterion 1.2.2: Captions (Prerecorded), Level A (prerecorded audio in synchronized media, speaker identification and non-speech sounds)
- W3C WCAG 2.2 Understanding Success Criterion 1.4.3: Contrast (Minimum), Level AA (4.5:1 minimum contrast for normal text, 3:1 for large text)
- Netflix English Timed Text Style Guide (42 characters per line, 2-line maximum, reading speed up to 20 characters per second for adult programmes and 17 for children's, and grammatical line-break rules)
Meta API references, apps and help pages
- IG User Media Reference (
POST /{ig-user-id}/media) (Reels parameters, 2,200-character post caption limit,alt_textunsupported on Reels, and absence of subtitle-track parameters) - Reels Publishing API for Pages (three-phase upload parameters and absence of subtitle-track parameters)
- Edits by Instagram (Instagram for Creators), Instagram Help: About Edits and Meta Newsroom: Introducing Edits (22 April 2025)
- Meta Business Help Center: About text overlays and the safe zone for ads in Stories and Reels (ads safe-zone guidance)
- Instagram Help: Hashtags and Social Media Today, 18 December 2025: Instagram implements new limits on hashtag use (5-hashtag cap)
Video filters and historical source check
- FFmpeg Filters Documentation (
subtitles,ass,drawtext) - Digiday, 17 May 2016: 85 percent of Facebook video is watched without sound (the origin of the self-reported 2016 publisher estimates)
What we could not confirm
- A complete list of languages supported by Instagram's Captions sticker and Edits. Meta's help center pages load parts of their text dynamically with client-side scripts and do not publish a single dated table of every supported auto-caption language by country. Check the language selector inside your own app.
- Whether every Facebook Reels composer screen supports
.srtfile uploads. While Meta's Reels Publishing API for Pages clearly omits a subtitle-file parameter, consumer and Business Suite composer screens vary by account and rollout. - Any platform-wide silent-viewing percentage or reach lift from captions on Reels. Meta publishes neither figure on the pages we checked, so we make no claim on either point.
About this guide
This guide was written and tested by the team behind PublishClip, a tool for scheduling and publishing Facebook and Instagram Reels. If you spot a rule that has changed or a command that behaves differently on your system, let us know.