Repurpose Video Content: One Video, Every Platform
When you repurpose video content with a single weekly workflow, one recording session gives you a horizontal master video and four to six vertical clips ready for every short-video feed. Instead of filming from scratch whenever Instagram Reels, Facebook Reels, YouTube Shorts or TikTok looks quiet, you follow six repeatable stages—plan, capture, cut, package, schedule and measure—inside a three-hour weekly time budget.
Cutting one video into several clips is only half the job. Each platform reads a different combination of caption, hook, cover image, title and hashtags, and each platform enforces its own originality rules. This guide gives you a three-hour weekly schedule. It shows you how to map clips before you press record. It covers framing and audio rules that survive a 9:16 crop. You also get free editing tools and a packaging table for each platform. Then come the originality rules from Meta and YouTube. Last, you get templates for your brief, caption bank, file names and tracking sheet. Where a tool can automate the queue, we say what is free and what is not: PublishClip schedules and publishes Facebook Reels and Instagram Reels for free, while YouTube Shorts and TikTok uploads are still done by hand today.
Last checked: 17 October 2026. Platform originality rules, publishing limits and tool prices change without warning, so every rule and price below carries the date we checked it.
On this page
- Repurpose video content: the one-page workflow
- Step 1: plan one idea so it becomes six assets
- Step 2: capture with reuse in mind
- Step 3: cut the master and the clips
- Step 4: package it for each platform
- Step 5: schedule the week
- Step 6: measure and improve
- Stay original: rules that protect your reach
- Tools and costs, checked on the writing day
- Templates you can copy
- Key takeaways
- Frequently asked questions
- Sources and how this was checked
Repurpose video content: the one-page workflow
To repurpose video content without spending your whole week in an editing timeline, treat the work as one assembly line with six stages rather than six separate shoots. First, pick one topic that answers a real customer question. Film it once, with room around your face for both wide and tall crops. Cut the long master first. Then pull out the short clips. Write separate packaging for each platform. Queue the week in one sitting. Finally, spend fifteen minutes reviewing what held attention.
Here is the six-stage weekly job list in plain words:
- Plan (20 minutes): Write a one-page brief around one customer problem and mark four to six self-contained moments before the camera turns on.
- Capture (35 minutes): Record one three-to-eight-minute master video in 4K with a dedicated microphone, keeping the speaker inside the centre third of the frame.
- Cut (50 minutes): Trim the horizontal master first, then slice out four to six vertical 9:16 clips of 15 to 45 seconds and burn in readable captions.
- Package (35 minutes): Write a separate caption for Instagram and Facebook, a searchable title for YouTube Shorts, a platform-safe cover frame and a clear call to action.
- Schedule (25 minutes): Queue your Facebook Reels and Instagram Reels in a scheduler or Meta Business Suite, and upload your YouTube Shorts and TikTok clips on staggered days.
- Measure (15 minutes): Log three-second hold, average watch time, shares and saves once a week so the strongest hook style shapes next week's brief.
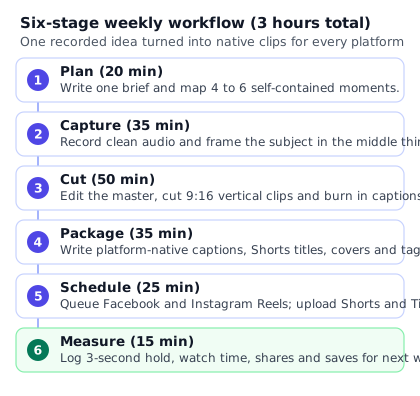
The three-hour weekly time budget
Most guides promise effortless reuse and hide the clock. When you cut clips one by one on the day you want to post, context switching eats your afternoon: you hunt for footage, re-open your editor, try to remember what you said at minute four, and write a rushed caption on your phone. Batching all six stages into a three-hour weekly block keeps each step inside a fixed boundary.
| Stage | Minutes per week | Input | Output | Where people lose time |
|---|---|---|---|---|
| 1. Plan | 20 | Customer questions and last week's tracking sheet | One-page brief with 4 to 6 spoken moments and hooks | Scripting word-for-word instead of listing bullet hooks |
| 2. Capture | 35 | One-page brief, camera or phone, lapel or USB mic | One 3 to 8 minute 4K master file plus 3 clean spoken intros | Moving lights and tripods for every single clip |
| 3. Cut | 50 | Raw master recording | Finished horizontal master plus 4 to 6 captioned 9:16 MP4 files | Scrubbing unscripted rambling looking for a 30-second point |
| 4. Package | 35 | Finished vertical clips and brief | Caption bank rows for IG, FB, Shorts and TikTok plus covers | Writing captions inside phone apps one post at a time |
| 5. Schedule | 25 | Named MP4 files, cover images and caption bank | 7-day calendar queued across Reels, Shorts and TikTok | Re-exporting files that fail platform size or length checks |
| 6. Measure | 15 | Platform insights after 7 days | Updated tracking sheet and one hypothesis for next week | Checking view counts every two hours on post day |
Three hours a week is realistic when you hold two rules steady. First, you plan the clip boundaries before you record, so the edit is an assembly job rather than a treasure hunt. Second, you keep one clean vertical master spec—1080 by 1920 pixels, H.264 video, AAC audio, 30 frames per second, and between 15 and 45 seconds—that passes every short-video feed without re-rendering.
Why you should not post the exact same package everywhere
When people say you should repurpose video content across platforms, they often mean exporting one MP4 and pasting the same paragraph into four boxes. Your video file can be the same clean export on every platform, provided it carries no third-party watermark, because it is your own original recording. What fails when copied verbatim is the packaging around that file.
Each feed surfaces text and thumbnails differently. Instagram Reels gives you up to 2,200 characters in the caption, a profile grid crop, and a five-hashtag limit that Social Media Today reported on 18 December 2025. Facebook Reels sits inside a feed where plain-language context above the fold and comment replies drive shares among local and interest groups. YouTube Shorts relies heavily on a concise, searchable title of up to 100 characters alongside the video. TikTok viewers expect an immediate spoken and on-screen hook that matches search phrases people type into the app. Our comparison of Reels vs YouTube Shorts vs TikTok breaks down how each audience discovers and watches short video. Treat the video cut as shared infrastructure and the packaging as native work.
Step 1: plan one idea so it becomes six assets
Good repurposing starts on paper before you turn on a light. If you record a five-minute video as one continuous, winding thought where every sentence depends on the sentence before it ("As I mentioned two minutes ago..."), you will struggle to pull even two clean Reels out of it. Every cut will start mid-thought or need clumsy text overlays to explain what the viewer missed.
When you plan one idea as a modular outline, a single recording session yields six distinct assets without extra filming:
- One horizontal master video (3 to 8 minutes): Published to YouTube or embedded on a service page or blog post on your website.
- Four to six vertical clips (15 to 45 seconds each): Each clip lifts one complete point from the master and stands on its own in Instagram Reels, Facebook Reels, YouTube Shorts and TikTok.
- One custom cover frame: Pulled from a clean still in the master recording or laid out in a 1080 by 1920 template with a safe-zone title in the centre.
- A platform-specific caption set: Tailored hooks and calls to action written once in your weekly caption bank.
- One static quote card or carousel slide: Built from the sharpest one-sentence rule or checklist in your brief.
- One short email or newsletter blurb: A 100-word summary that states the takeaway and links readers to the full master video or booking page.
How to build a moment map before you press record
A moment map divides your three-to-eight-minute topic into four to six self-contained blocks. Each block is built from three parts that take 20 to 40 seconds to speak aloud:
- The standalone hook (0 to 3 seconds): A complete sentence that names the problem, myth or result without referring to earlier parts of the video. Never start a block with "Second," "Another thing is," or "Going back to that." Start with a noun and a verb that make sense to a stranger scrolling past.
- The proof or demonstration (3 to 30 seconds): One concrete example, visual step, number or before-and-after comparison that proves the hook.
- The clean payoff (last 5 seconds): A single concluding sentence that resolves the thought, followed by a full two-second pause where you keep looking at the lens before moving to the next block.
That two-second pause at the start and end of each block is the secret to a 50-minute edit. In your editing timeline, those pauses show up as flat gaps in the audio waveform. You can spot every clip boundary by eye before you even play the footage back.
Worked example 1: a hair salon
Suppose a salon owner wants to film one five-minute video answering a question clients ask every week: why salon colour fades fast at home and how to keep it glossy between appointments. Instead of talking through hair care in one unbroken stream, the brief maps five self-contained moments:
- Moment 1 (The water temperature myth, 30 seconds): Opens with "Hot showers strip salon toner faster than almost any shampoo." Shows a quick rinse demonstration at the basin and ends with the exact lukewarm temperature rule.
- Moment 2 (The sulphate label check, 35 seconds): Opens with "Turn your shampoo bottle around and look at the second ingredient on the label." Holds two bottles up to the lens, points to the surfactant line, and finishes with what to buy instead.
- Moment 3 (Heat styling without protection, 25 seconds): Opens with "Running a 210-degree iron over dry ends oxidises fresh colour in one pass." Shows a two-second misting of heat protectant and dials the iron down to 180 degrees.
- Moment 4 (Washing frequency, 30 seconds): Opens with "Washing coloured hair every single morning doubles your salon bill over a year." Explains a three-day wash cycle and how to refresh roots on day two.
- Moment 5 (The four-week gloss top-up, 25 seconds): Opens with "You do not need a full colour appointment every time your shine drops." Shows a before-and-after clip of a 20-minute salon gloss service.
Together, those five blocks plus a 30-second intro and outro make a four-minute horizontal guide for YouTube and the salon's booking page. Divided at the pauses, they become five vertical Reels that each make complete sense to someone who never saw the other four.
Worked example 2: a small-business accountant
An accountant serving freelancers and local tradespeople plans a six-minute video on five expenses sole traders forget to record before tax season. Each expense becomes one modular block:
- Moment 1 (Home office proportion, 35 seconds): Opens with "Working from your kitchen table still qualifies for a simplified home-working deduction if you track the hours." Shows a simple spreadsheet row on screen.
- Moment 2 (Business mileage log, 30 seconds): Opens with "Fuel receipts alone will not pass a mileage check if you cannot show the trip purpose." Demonstrates a four-column trip log.
- Moment 3 (Software subscriptions on personal cards, 25 seconds): Opens with "A business tool accidentally paid on your personal debit card is still claimable when you log the invoice." Explains how to attach the PDF receipt.
- Moment 4 (Phone bill split, 30 seconds): Opens with "You cannot claim 100 percent of a personal mobile contract, but you can claim the itemised business share." Shows how to mark one month's bill.
- Moment 5 (Professional memberships and trade bodies, 25 seconds): Opens with "Annual fees for approved trade registers can come straight off your taxable profit." Lists how to check the approved list.
Every block avoids saying "Number three on our list." That way, the mileage clip can go out on Tuesday on Instagram Reels, the phone bill clip can run on Thursday on Facebook Reels, and neither viewer feels like they walked into the middle of a lecture.
Worked example 3: an online ceramic kitchenware shop
An independent online shop selling handmade stoneware baking dishes records a four-minute care and cooking video. The moment map breaks the shoot into four visual clips:
- Moment 1 (Thermal shock rule, 30 seconds): Opens with "Never put a cold stoneware dish straight from the fridge into a preheated oven." Shows the dish coming to room temperature on a wooden board while the oven heats.
- Moment 2 (Removing baked-on cheese without steel wool, 35 seconds): Opens with "Metal scourers scratch ceramic glaze, so use warm water and two spoons of baking soda instead." Shows a 15-second soak and wipe.
- Moment 3 (Oven-to-table heat retention, 25 seconds): Opens with "Stoneware holds heat for twenty minutes on the table if you rest it on a cork mat." Shows the dish serving at the table.
- Moment 4 (Stacking dishes safely in a cupboard, 25 seconds): Opens with "Slip a felt pan protector or folded linen napkin between stoneware rims so the glaze never chips." Demonstrates the stack.
Notice how each business uses the exact same structure. One topic, four to five standalone moments, a clear spoken opening sentence, one visual proof point, and a clean pause before the next point begins.
Step 2: capture with reuse in mind
Once your moment map is written, the 35-minute capture stage is about recording a master file that survives both a horizontal 16:9 timeline and a vertical 9:16 crop without losing your face, your hands or your voice. If you frame a horizontal shot the traditional way—with the speaker close to the lens filling the vertical height of the 16:9 frame—cropping the sides for a 9:16 Reel will slice off your shoulders, your gestures and anything you hold up.
Shoot wide and keep the subject in the middle third
Set your camera or phone horizontally in 16:9, step back half a metre further than feels normal, and place yourself inside the centre third of the horizontal frame. Turn on your camera's 3-by-3 grid overlay before you record. When you look at that grid on a horizontal screen, the middle column of three boxes is almost the exact width of a 9:16 vertical crop.
Keep three physical boundaries in mind while you speak and demonstrate:
- Stay inside the centre grid column: Your head, torso and any product or prop you hold up should live inside that middle third so a fixed centre crop catches all the action without keyframing.
- Leave extra headroom and chin room: Vertical platforms place search bars, audio labels, account handles and multi-line captions over the top and bottom of the 9:16 frame. Leaving clean space above your head and below your chest keeps burned-in captions off your chin and out of the platform UI overlays.
- Keep backgrounds uncluttered in the centre strip: A lamp or bookshelf edge that looks balanced on the far left of a 16:9 frame disappears in vertical, while a bright window right behind your shoulder will dominate the 9:16 crop.
Our step-by-step guide on how to convert horizontal video to vertical covers the exact pixel dimensions, safe zones and crop math for turning 16:9 footage into 1080 by 1920 vertical video.
Record 4K when your camera allows it
When you crop a 9:16 vertical strip out of the middle of a standard 1080p (1920 by 1080) horizontal video, the vertical strip is only 607 pixels wide by 1080 pixels tall. Scaling 607 pixels back up to 1080 pixels wide for Reels or Shorts softens fine detail around eyes, hair and product labels.
If your phone or camera records 4K UHD (3840 by 2160), a 9:16 vertical crop from the centre measures 1215 by 2160 pixels. That is still sharper than the 1080 by 1920 target resolution for Instagram Reels, Facebook Reels, YouTube Shorts and TikTok. You can scale a 4K centre crop down cleanly to 1080 by 1920—or even push in slightly to emphasize a punchline—without introducing blur. Keep your frame rate locked at a constant 30 frames per second (or 60 frames per second if you film fast physical movement) and turn off variable frame rate or auto-FPS modes on phones, which often cause audio drift in desktop editors.
Record clean spoken audio first
Viewers will forgive a slightly soft phone camera lens long before they forgive hollow, echoey room audio. When you repurpose video content into five or six short clips, bad audio multiplies your editing time: automatic captioning tools misread words in reverberant rooms, and viewers scroll past within two seconds if your voice sounds distant.
Use a clip-on wireless microphone or a dynamic USB microphone placed 15 to 20 centimetres from your mouth. Before you record the full five-minute brief, record a 10-second test sentence and play it back on headphones. Check three things:
- No clipping on loud consonants: Your voice peaks should sit comfortably around -12 dB to -6 dB, never hitting 0 dB.
- Low room echo: Record in a room with curtains, rugs, sofas or bookshelves rather than bare tiles and glass.
- No background music playing in the room: Never play copyrighted music through speakers while filming. A single background track playing in a salon or gym can trigger automated copyright mutes across all six clips on Instagram, Facebook, YouTube and TikTok, and prevents you from cutting sentences cleanly.
Shoot extra standalone intros and visual cutaways
At the end of your 35-minute recording session, before you turn off the microphone, spend three minutes recording two extra ingredients that make your clips feel native:
- Three alternative two-second spoken hooks for your best clip: Speak three different opening lines for your strongest moment ("Here is the three-second check before you...", "Stop doing this to your...", "Most people waste money on..."). That gives you alternate openings if you want to test hooks or vary the opening on different platforms.
- Thirty seconds of silent B-roll: Film close-up shots of your hands doing the task, the finished result, the tool or screen you talked about, all framed vertically in the centre third. Three seconds of crisp B-roll over a cut hides jump cuts when you trim a pause or tighten a sentence.
Finally, if a client, customer or colleague appears on camera or speaks in your footage, get their clear permission before you shoot and let them know the clip will appear across your short-video accounts.
Step 3: cut the master and the clips
Stage 3 has a 50-minute weekly budget because you are not inventing the story in the timeline. You already built the moment map in Stage 1 and paused for two seconds between moments in Stage 2. Your job now is mechanical: clean up the horizontal master video first, pull the four to six vertical clips from that clean timeline second, and burn in legible captions third.
Edit the horizontal master before you touch vertical
Always cut your audio and remove mistakes on the horizontal master timeline before duplicating sequences for vertical clips. If you slice out vertical clips from raw, unedited footage first, you will end up fixing the same stumbles, throat-clears, audio levels and colour balance five separate times.
Follow this sequence inside your editor:
- Normalise and clean the dialogue track once: Set your spoken dialogue so it sits evenly and clearly, and apply a light high-pass filter if there is air-conditioning rumble.
- Colour-correct the camera clip once: Fix white balance and exposure on the master clip so skin tones and products look natural across every cut.
- Cut the horizontal master (3 to 8 minutes): Trim false starts, tighten long pauses inside each block, leave the clean transitions between your mapped moments, and export the 16:9 master file for YouTube or your website.
Pull four to six standalone clips with a two-second hook
Once the horizontal master is exported, duplicate that cleaned timeline or select each mapped moment between your two-second waveform gaps and switch the sequence resolution to 1080 by 1920 (vertical 9:16).
Every short clip lives or dies by its first two seconds. When you trim a clip out of a longer recording, cut every millisecond of breath, lip-smack or hesitation before the first spoken word. The first frame of the exported MP4 should already have your mouth opening on the first syllable of your hook sentence.
Check each vertical clip against four tight rules:
- One idea per clip: If a clip tries to explain two separate tips, split it into two clips or cut the second tip. A 28-second clip that proves one point cleanly holds viewers far better than a 65-second clip that wanders.
- 15 to 45 seconds for everyday educational clips: While platforms accept longer uploads, 15 to 45 seconds is the sweet spot when you repurpose video content from a weekly shoot: it fits inside every API and app limit, renders quickly, and rewards high completion rates.
- Visual movement in the first three seconds: Pair your opening spoken hook with a slight zoom, a prop held up to the camera, or a two-second B-roll flash of the finished result so the frame is not static.
- A loop-friendly or decisive ending: End the clip within half a second of your final payoff word. Do not leave five seconds of "So yeah, let me know what you think in the comments and don't forget to subscribe" at the tail of a short clip—that is where viewers swipe away and drag down your average percentage viewed.
Burn in captions inside the vertical safe zone
Many people watch short video on mute on a train, in a waiting room or late at night. Burned-in captions—or platform captions placed carefully inside the safe zone—make sure your hook lands before the viewer even touches their volume button.
Keep captions in the middle-lower band of the 1080 by 1920 frame, well above the bottom 350 to 420 pixels where Instagram, Facebook, YouTube Shorts and TikTok stack account names, audio tickers and caption text, and below the top 250 pixels where search icons and status bars sit. Use a bold, high-contrast sans-serif font with a dark stroke or semi-transparent background pill, and show three to six words per line so the eye reads them in a single glance. Our guide on how to add captions to Reels compares automatic, manual and burned-in caption workflows in detail.
Free editors for cutting and captioning
You do not need an expensive monthly subscription to cut a master video and four vertical clips. As of 17 October 2026, these free options cover mobile, desktop and browser workflows:
- Edits by Instagram (free on iOS and Android): Instagram launched its dedicated Edits app on 22 April 2025, and Instagram's help page for Edits describes it as a free video creation app for making videos on your phone for any platform. Third-party reviews report automatic captions, 4K export without a watermark, and bilingual caption support added in July 2026. Because exports carry no watermark, a clip cut in Edits can be posted cleanly to Instagram Reels, Facebook Reels, YouTube Shorts and TikTok.
- DaVinci Resolve (free edition on Windows, macOS and Linux): Blackmagic Design's free desktop editor handles 4K 16:9 timelines and 1080 by 1920 vertical timelines in the same project, so you can grade and mix audio once on your horizontal master and switch timeline resolution to 9:16 for your clips without paying for a licence.
- CapCut (check free vs Pro labels before exporting): CapCut runs on phone and desktop, but many auto-caption templates, vocal isolation tools and effects move between the free tier and paid Pro tier over time. Always inspect your timeline for "Pro" badges before you spend twenty minutes styling a clip, and export without any end-card or watermark.
- PublishClip Studio (browser editor for 9:16 Reels): Inside PublishClip, the Studio editor lets you trim vertical clips, set cover frames and prepare captions in your browser before sending them to your media library and scheduling queue for Facebook Reels and Instagram Reels.
Batch-cutting and cropping with FFmpeg
If you prefer a fast, repeatable command-line pass to slice mapped timestamps out of a 4K horizontal master and crop the centre 9:16 strip in one step, FFmpeg's filter documentation gives you crop, scale, pad, gblur, overlay, vstack, subtitles, ass and drawtext.
For example, when your speaker is framed in the centre third of a 3840 by 2160 horizontal master (master-4k.mp4) and Moment 1 runs from 00:00:42 for 32 seconds, this single command cuts that segment, crops the centre 9:16 area, scales it to 1080 by 1920, encodes H.264 High Profile at a constant 30 frames per second with AAC stereo audio, and places the MP4 index at the front of the file:
ffmpeg -ss 00:00:42 -i master-4k.mp4 -t 32 \
  -vf "crop=ih*9/16:ih,scale=1080:1920,fps=30,format=yuv420p" \
  -c:v libx264 -profile:v high -preset medium -crf 20 -g 60 \
  -c:a aac -b:a 128k -ar 48000 -ac 2 \
  -movflags +faststart \
  2026-10-17_salon-colour-care_c01_9x16.mp4
If you also have an .srt or .ass subtitle file ready for that clip, appending ,subtitles=clip01.srt inside the -vf chain burns the captions straight into the video frames during the same pass. When a horizontal screen recording cannot be centre-cropped without losing the edges, FFmpeg's split, gblur, scale and overlay filters let you place the full 16:9 frame over a softly blurred 9:16 background, or vstack lets you stack a talking-head crop above a screen-demo crop. You can see tested filter chains for every layout in our guide to converting horizontal video to vertical.
Step 4: package it for each platform
Stage 4 takes 35 minutes a week and separates thoughtful repurposing from lazy cross-posting. Your exported MP4 file can be shared across all four short-video feeds—because it is your own clean, watermark-free master cut—but the text, title, hashtags, cover image and call to action around that MP4 must be written for the specific app where the viewer meets it.
What changes per platform
Each short-video platform gives viewers a different set of hooks and actions around the video player. Writing all four in one spreadsheet row while the clip is fresh in your head takes about six minutes per clip.
| Element | Instagram Reels | Facebook Reels | YouTube Shorts | TikTok |
|---|---|---|---|---|
| Primary text field | Caption up to 2,200 characters; first line before "more" carries the hook | Caption with plain-English context in the first 1 to 2 sentences | Searchable title up to 100 characters; keep the main phrase in the first 50 to 60 characters | Caption up to 4,000 characters built around natural search phrases |
| Hashtags | Up to 5 relevant niche tags (Instagram capped posts at 5 hashtags in late 2025) | 1 to 3 broad topic or local tags, or none at all | 2 to 3 topic tags in title or description | 3 to 5 specific search-intent tags matching spoken words |
| Cover image | 1080 by 1920 vertical image; keep title text inside the centre 1080 by 1080 and 3:4 profile grid crop | Frame chosen in app or Business Suite (the Reels API for Pages has no custom cover field) | Frame selected during mobile upload or thumbnailed for channel shelves | Frame chosen in uploader with optional native text banner |
| Links in text | URLs in captions are not clickable; point people to your profile link or a specific pinned post | Plain URLs are clickable in descriptions, though native conversation in comments often performs well | Links in Shorts descriptions and comments are not clickable; use the Related Video link field to point to your horizontal master | URLs in captions are not clickable; point to your bio link or search keyword |
| Best call to action | "Save this checklist for your next..." or "Read the 3 steps in the caption" | Ask a direct, easy-to-answer question that invites local or peer comments and shares | Point viewers to the linked full-length YouTube master video on the player | Prompt a specific comment question or tell viewers to check the next part on your profile |
Let's unpack the four packaging details that trip people up most often when they repurpose video content.
First, Instagram's five-hashtag limit. For years, social media templates told creators to paste 25 or 30 hashtags at the bottom of every Instagram caption. As Social Media Today reported on 18 December 2025, Instagram rolled out a hard limit of five hashtags per post after testing even tighter caps earlier that autumn. Pasting a block of twenty hashtags from an old template will either fail or waste space that could hold helpful, searchable sentences. Pick three to five specific tags that describe the exact problem, service or location in the clip.
Second, YouTube Shorts titles vs social captions. On Instagram and Facebook, your text is a caption that expands when tapped. On YouTube Shorts, the text viewers see in the feed and on your channel tab is a title, capped at 100 characters. If you paste a 600-character Instagram caption into a Shorts title field, it gets cut off mid-sentence and looks broken in search results. Write a crisp 45-to-65-character title that states the problem or result clearly ("Why Salon Hair Colour Fades Fast in Hot Showers") and use YouTube's built-in "Related video" field to link the Short directly to your 16:9 horizontal master video.
Third, Instagram Reel covers and profile grid safe zones. When someone visits your Instagram profile to decide whether to follow or book with you, your Reel covers appear cropped in your profile grid. If your cover text sits near the top or bottom edge of the 9:16 frame, the grid slices the words in half. Place your three-to-five-word cover title right in the centre safe zone so it reads cleanly both in the 9:16 Reels tab and in the profile grid. Our guide to Instagram Reel cover size and safe zones has a downloadable safe-zone diagram and exact pixel margins.
Fourth, why Facebook and Instagram need separate captions. Even though Meta owns both apps, their audiences behave differently. On Instagram, viewers respond well to a punchy first-line hook followed by a structured, scannable checklist they can save for later. On Facebook, viewers often share Reels into family chats, community groups or local pages when the first two lines read like a warm, relatable note from a real person or local business. Our guide to cross-posting Reels to Facebook and Instagram walks through side-by-side caption examples for both feeds.
File naming and folder handoff
When one weekly shoot creates one horizontal master, five vertical clips and five cover frames, saving files as final_v2_reel_edit_actual.mp4 guarantees you will upload the wrong clip on Thursday morning. Use a single, sortable file-naming convention across your computer and cloud storage:
YYYY-MM-DD_topic-slug_cNN_aspect_variant.ext
Here is what one week's folder looks like with that rule applied:
2026-10-19_salon-colour-care/
  01_raw/
    2026-10-19_salon-colour-care_raw-cam_16x9.mp4
  02_master/
    2026-10-19_salon-colour-care_master_16x9.mp4
  03_clips/
    2026-10-19_salon-colour-care_c01_9x16_clean.mp4
    2026-10-19_salon-colour-care_c02_9x16_clean.mp4
    2026-10-19_salon-colour-care_c03_9x16_clean.mp4
    2026-10-19_salon-colour-care_c04_9x16_clean.mp4
    2026-10-19_salon-colour-care_c05_9x16_clean.mp4
  04_covers/
    2026-10-19_salon-colour-care_c01_cover_1080x1920.png
    2026-10-19_salon-colour-care_c02_cover_1080x1920.png
Because every file starts with the ISO date (YYYY-MM-DD) and clip number (c01 through c05), your operating system sorts them in exact publishing order automatically, and each clip number matches the row code in your caption bank and tracking sheet.
Step 5: schedule the week
Stage 5 takes 25 minutes because your videos are exported, named in order, and matched to pre-written captions. Instead of opening four phone apps every morning, you load the whole week in one sitting.
Why staggering beats blasting every platform at the same minute
When you have five clips ready on Monday morning, it is tempting to post Clip 1 to Instagram, Facebook, YouTube Shorts and TikTok at 09:00 on Monday, Clip 2 to all four at 09:00 on Tuesday, and so on. That works, but staggering your clips across the week is often smarter for people who follow you on more than one app.
If a loyal client follows your salon or studio on both Instagram and Facebook, seeing the exact same 30-second video at 09:00 on both feeds invites them to scroll past the second one. If you post Clip 1 on Instagram on Monday and schedule Clip 1 for Facebook on Tuesday while Instagram gets Clip 2 or a rest day, someone who follows you on both platforms sees fresh material all week.
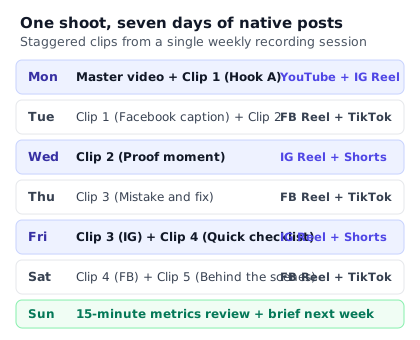
Copyable seven-day publishing calendar for one repurposed shoot
Here is the weekly calendar in a copyable table. It turns one master video and five vertical clips (c01 to c05) into a steady seven-day presence without posting the same clip on the same day across sister platforms.
| Day | YouTube (Long + Shorts) | Instagram Reels | Facebook Reels | TikTok |
|---|---|---|---|---|
| Monday | Publish 16:9 Master Video | Post Clip c01 (Hook A + save checklist caption) | Rest or reply to weekend comments | Post Clip c02 (Direct search hook) |
| Tuesday | Post Short c01 (linked to Master) | Rest or Story reminder | Post Clip c01 (Conversational local caption) | Rest |
| Wednesday | Post Short c02 (linked to Master) | Post Clip c02 (Proof moment + 5 niche tags) | Post Clip c03 (Question-led caption) | Post Clip c01 (Search-phrased caption) |
| Thursday | Rest | Post Clip c03 (Mistake and fix) | Rest | Post Clip c03 (Fast-cut hook) |
| Friday | Post Short c04 (linked to Master) | Post Clip c04 (Weekend prep tip) | Post Clip c02 (Story-style caption) | Post Clip c04 (Checklist caption) |
| Saturday | Post Short c05 (linked to Master) | Rest | Post Clip c04 (Weekend discussion prompt) | Post Clip c05 (Behind the scenes) |
| Sunday | 15-minute review in YouTube Studio | Post Clip c05 + 15-minute Insights check | Post Clip c05 + Business Suite check | 15-minute TikTok analytics check |
You do not have to fill every cell in week one. If you cut four clips instead of five, drop the Saturday slots and run three to four posts per platform per week. Consistency over twelve weeks beats a frantic seven-day sprint followed by three weeks of silence.
Scheduling Facebook Reels and Instagram Reels
For your Meta channels, you can queue the entire week from your computer in about ten minutes:
- With PublishClip (free for Facebook Reels and Instagram Reels): Upload your vertical 9:16 MP4 files (
c01throughc05), store them in your media library or save reusable caption structures in caption templates, and open Compose. PublishClip gives you a separate caption box for Facebook and Instagram on the same screen. Paste your checklist-style caption into the Instagram box. Paste your chatty caption into the Facebook box. Pick each post's date and time in your own time zone. Then check the week on the/calendarpage. PublishClip validates that each file is 9:16 and between 3 and 90 seconds so it passes both Meta's Reels API for Pages and Instagram's Content Publishing API. - With Meta Business Suite or the Instagram app: You can also schedule directly in Meta's own tools. Our guide to scheduling Instagram Reels compares the scheduling windows across the Instagram app (30 days without a subscription, or 365 days with Meta One Advanced, Expert or Max as of 17 October 2026), Business Suite and API schedulers.
Keep Meta's rolling 24-hour publishing caps in mind if you ever batch-publish for high-volume accounts. As of 17 October 2026, Meta's Instagram content publishing guide states a limit of 100 API-published posts per 24-hour moving period (while its content publishing limit reference still lists 50), and Meta's Reels API for Pages caps Facebook Pages at 30 API-published Reels per 24-hour period. A normal weekly repurposing calendar of four to six clips comes nowhere near those ceilings, and if an account ever hits a daily cap, PublishClip holds the post and defers it until the rolling window resets.
Uploading YouTube Shorts and TikTok by hand
We want to be completely clear about what PublishClip does and does not do today: as of 17 October 2026, PublishClip publishes to Facebook Reels and Instagram Reels only, and does not post to YouTube Shorts or TikTok.
Why do many small teams still upload Shorts and TikTok clips directly inside YouTube Studio and TikTok's uploader? Beyond API audit rules—where unaudited developer clients on both YouTube and TikTok have historically had uploads restricted to private viewing—YouTube Studio's native desktop and mobile upload flows let you attach the "Related video" link that sends Shorts viewers straight to your long-form 16:9 YouTube master video. Because your 03_clips/ folder and caption bank already sit on your computer in date order, dragging four MP4s into YouTube Studio and TikTok Web and setting their scheduled publish times takes about ten minutes of your 25-minute scheduling block.
Step 6: measure and improve
Stage 6 takes 15 minutes at the end of the week. The goal of measuring repurposed clips is not to admire view totals or panic when one clip gets 300 views. The goal is to find out which moment and which hook style earned attention so next week's 20-minute planning brief gets sharper.
What to track across your clips
Because every platform counts views slightly differently, raw view counts can mislead you if you compare Facebook directly against TikTok. Instead, track five behavioural signals that tell you how people reacted to the clip itself:
- Three-second hold or stayed-to-watch rate: What share of people who saw the first frame stayed past the opening three seconds instead of swiping away. This measures your spoken hook, visual opening and first caption line.
- Average watch time and percentage viewed: How much of the 25-second or 35-second clip people actually watched. If viewers stay for three seconds and drop at second ten, your hook worked but your middle explanation dragged.
- Shares and sends per 1,000 views: How often viewers sent the Reel to a friend or shared it to a Story or group. High shares tell you the topic hit a nerve worth talking about.
- Saves and bookmarks per 1,000 views: How often viewers saved the clip for later. High saves show that your checklist, recipe, tax rule or tutorial delivered practical reference value.
- Profile visits, Related Video clicks and enquiries: Whether the clip moved people from the feed to your profile, your full YouTube master video, or your booking page.
Where to find the numbers in 15 minutes
Open each platform once a week—never five times a day—and look at clips that have had at least five to seven days to settle:
- Instagram Insights: Open the professional dashboard or tap "View insights" under each Reel. As Instagram's help page on Reels insights explains, you can inspect accounts reached, views, watch time, average watch time, likes, comments, saves and shares.
- Meta Business Suite: Under Content or Insights, compare your Facebook Reels and Instagram Reels side by side to see whether a conversational Facebook caption outperformed a checklist Instagram caption on the exact same video clip.
- YouTube Studio: Open Analytics for each Short to see "Viewed vs. swiped away," average percentage viewed, and how many viewers clicked through the Related Video link to your horizontal master.
- TikTok Studio / Analytics: Check average watch time, the percentage of viewers who watched the full video, and the retention graph drop-off second, plus the search queries that brought viewers to the clip.
How to run a four-week repurposing experiment
When you repurpose video content every week, you have a natural laboratory: five clips from the same speaker, in the same room, on the same core topic. Use a simple four-week test to improve one variable at a time:
- Weeks 1 and 2 (Hook pattern test): On two clips each week, open with a direct mistake warning ("Never put cold stoneware in a hot oven"). On the other two clips, open with a positive how-to result ("How to keep stoneware glossy for ten years"). Compare stayed-to-watch rates and average watch time after seven days.
- Weeks 3 and 4 (Length test): Cut two moments each week tight at 18 to 24 seconds and leave two moments at 35 to 45 seconds with extra detail. Compare completion rate, saves per 1,000 views and shares per 1,000 views.
Write down the winning pattern at the bottom of your tracking sheet. Next Monday, when you sit down for your 20-minute Stage 1 brief, build all five moment hooks around the style that won.
Stay original: rules that protect your reach
A common fear among creators and business owners is that if they repurpose video content and post the same clip to Instagram Reels, Facebook Reels, YouTube Shorts and TikTok, the platforms will flag their account as spam or shadowban their reach.
Read the actual policy pages and one point stands out. Every platform penalises content copied from other creators without real changes. Your own footage, posted to your own accounts, is fine. Still, a few habits can hurt your reach. Two common ones are leaving another app's watermark on a video and posting mass-produced template videos. Here is what each platform states as of 17 October 2026.
Facebook's originality rules (updated March 2026)
In March 2026, Meta published Rewarding original creators on Facebook alongside its Original content guidelines on Facebook in the Meta Business Help Centre. Those pages state three rules that every creator repurposing video should know:
- Your own footage is original: Facebook defines original content as content "filmed or produced directly by a creator or owner of a Profile or Page." When you film yourself or your business and cut that master into vertical clips for your Facebook Page, that footage is original under Meta's definition.
- Cosmetic edits to someone else's video do not make it original: Meta states that duplicative content and minor edits to another creator's post—specifically naming "adding borders, inserting captions, and changing the reel's speed"—count as unoriginal and are likely to have their distribution reduced. Reels that include third-party material count as original only when the creator adds something meaningfully new, such as substantive commentary, reaction or creative narrative.
- Account-level consequences and appeals: Meta warns that accounts that repeatedly or mostly post unoriginal content "may see their account deemed non-recommendable and demonetized," while noting that creators can check their status and appeal inside Professional Dashboard.
Instagram's originality and recommendation rules
Instagram's About original content on Instagram and Recommendations on Instagram help pages draw the same boundary between your own work and recycled clips from around the web:
- Immaterial edits to other sources are not recommended: Instagram states that unoriginal content largely repurposed from another source without material edits is not eligible for recommendation to non-followers. Stitching clips together from other accounts or slapping your own watermark over someone else's clip does not count as a material edit.
- Visible watermarks and recycled platform reposts reduce reach: Instagram's creator guidance notes that Reels with noticeable watermarks or logos recycled from other video apps, or low-resolution reposts of Reels already circulating on Instagram, are less likely to be recommended.
The practical lesson is simple: never download your published TikTok video (with the bouncing TikTok watermark and end-card) and upload that watermarked file to Instagram Reels or Facebook Reels. Always export a clean, watermark-free master MP4 from your editing software—or from Instagram's free Edits app—and upload that clean file to each platform. Some marketing blogs claim Instagram widened these rules in April 2026. Those claims come from secondary commentary, not a Meta policy page. Stick to what Instagram's own help pages say.
YouTube's inauthentic and reused content rules (updated July 2025)
On 15 July 2025, YouTube updated its YouTube channel monetization policies (read on 17 October 2026). Two policy sections govern how you repurpose video content on YouTube Shorts and long-form YouTube:
- Inauthentic content (formerly called "repetitious content"): On 15 July 2025, YouTube renamed its "repetitious content" policy to "inauthentic content." It targets content that is mass-produced, templated or programmatically generated with minimal human variation—for example, dozens of nearly identical slideshow videos or synthetic voice readings scraped from websites.
- Reused content: YouTube states that reused content is "content downloaded or copied from another online source without any substantive modifications." Crucially, YouTube evaluates reused content across your entire channel when reviewing for the YouTube Partner Program, and notes that simply having permission from another creator does not make unaltered re-uploads eligible for monetisation unless you add substantive commentary, educational value or creative transformation.
When you cut your own horizontal YouTube video into four or five YouTube Shorts on your own channel, you are clipping your own original production, not scraping third-party material. To keep your channel unmistakably authentic under YouTube's rules, make sure each Short delivers a distinct point, give each Short its own specific title, and avoid uploading five near-identical edits of the exact same 20-second sentence with only the background colour changed.
Music rights and AI disclosure labels
Two final compliance checks belong in your weekly routine:
- Music licensing across business accounts: A trending pop track inside Instagram's or TikTok's consumer music library is rarely cleared for commercial use on business accounts or for cross-platform export. If you bake a TikTok sound into your MP4 and upload it to YouTube Shorts or Facebook Reels, you risk immediate copyright claims or muted audio. Record your spoken voice cleanly without music, or use royalty-free tracks cleared for multi-platform commercial use.
- Labelling realistic AI footage: If a clip includes photorealistic AI-generated video or synthetic voice/likeness, disclose it using each platform's native AI content toggle during upload so your account stays in good standing with platform transparency rules.
Tools and costs, checked on the writing day
You can run the entire six-stage workflow to repurpose video content using free software. Where paid tiers exist, they usually buy extra social channels, longer scheduling queues, team approval workflows or historical analytics.
We opened each vendor page below on 17 October 2026. Software companies adjust plan limits, currencies and free tiers frequently, so check the live pricing page before you commit to a paid subscription.
| Tool | Job in workflow | Free tier as of 17 Oct 2026 | Paid plans as of 17 Oct 2026 | Key catch to know |
|---|---|---|---|---|
| Edits by Instagram | Phone editing & auto captions | Free app on iOS and Android; 4K export with no watermark | None | Mobile only; built for phone-first cutting and captioning |
| DaVinci Resolve | Desktop cutting, colour & audio | Free edition covers 4K 16:9 and 1080x1920 9:16 timelines | Studio edition is a one-off licence (optional) | Needs a capable desktop or laptop computer |
| FFmpeg | Command-line cropping & batch cuts | Free, open-source on macOS, Windows and Linux | None | Command-line interface; best for repeatable batch recipes |
| Meta Business Suite | Facebook & Instagram scheduling + insights | Free in browser and mobile app for linked Pages and IG professional accounts | None (Meta One is a separate consumer/creator subscription from 15 Sep 2026; core tools stay free) | Bulk upload is Facebook Page only; scheduling window is not stated on Meta's readable help pages |
| PublishClip | Facebook Reels & Instagram Reels studio, library & scheduler | Free plan with 9:16 Studio editor, media library, caption templates, per-platform captions, drafts and calendar | See pricing page | Facebook Reels and Instagram Reels only (3 to 90 seconds, 9:16); no YouTube Shorts or TikTok publishing today |
| Buffer | Multi-network scheduling | Free plan: 3 channels, 10 scheduled posts per channel ("refill anytime"), 1 user, 30-day insights | Essentials from 5 USD a month for 1 channel (60 USD billed yearly) | Custom video covers, first-comment scheduling and hashtag manager are not included on the free plan |
| Metricool | Multi-network scheduling & analytics | Free plan: 1 brand, up to 20 scheduled posts per month (excludes LinkedIn and X/Twitter) | Paid plans listed from about 16 to 20 per month (billing currency/tab varies by region) | The pricing page does not explicitly state Reels-specific limits on the free tier, so test one post first |
| Later | Multi-network scheduling | No free plan listed on 17 Oct 2026; 14-day free trial | Starter at 18.75 USD a month billed yearly (1 social set, 8 profiles, up to 30 posts per profile) | Requires a paid plan after the 14-day trial |
Data sources for the table: Edits by Instagram and About Edits, Meta Business Suite, Introducing Meta One, Buffer pricing, Metricool pricing, and Later pricing, all checked on 16 and 17 October 2026.
Templates you can copy
Save the four templates below into a notes doc or spreadsheet. Reusing the same structure every Monday removes decision fatigue and keeps your weekly time budget inside three hours.
Template 1: the one-page weekly video brief and moment map
Fill this out in 20 minutes during Stage 1 before you turn on your camera:
WEEKLY VIDEO BRIEF & MOMENT MAP
Week of: YYYY-MM-DD
Topic slug: [short-kebab-slug, e.g., salon-colour-care]
Target audience question: [One sentence a real client asked this month]
Master video goal (3-8 min): [What the viewer can do after watching]
Primary call to action: [e.g., Book a gloss consultation / Watch the full guide]

HORIZONTAL INTRO (0:00 - 0:25):
- Opening hook sentence:
- Why this matters right now:

MOMENT 1 (Clip c01 — Target length: 25-35s)
- Standalone spoken first sentence (no "First of all"):
- Visual proof or prop to show in centre third:
- One-sentence payoff + 2-second silent pause:

MOMENT 2 (Clip c02 — Target length: 25-35s)
- Standalone spoken first sentence:
- Visual proof or prop to show in centre third:
- One-sentence payoff + 2-second silent pause:

MOMENT 3 (Clip c03 — Target length: 25-35s)
- Standalone spoken first sentence:
- Visual proof or prop to show in centre third:
- One-sentence payoff + 2-second silent pause:

MOMENT 4 (Clip c04 — Target length: 25-35s)
- Standalone spoken first sentence:
- Visual proof or prop to show in centre third:
- One-sentence payoff + 2-second silent pause:

MOMENT 5 (Clip c05 — Target length: 25-35s)
- Standalone spoken first sentence:
- Visual proof or prop to show in centre third:
- One-sentence payoff + 2-second silent pause:

EXTRA CAPTURE CHECKLIST (last 3 minutes of shoot):
[ ] 3 alternative 2-second spoken hooks for Moment 1
[ ] 30 seconds of vertical centre-framed B-roll of hands/product/result
[ ] Still frame for 1080x1920 cover image
Template 2: the per-platform caption bank
During Stage 4 (35 minutes), write the packaging for all five clips in one table or inside PublishClip's caption templates so you never have to compose text on a tiny phone keyboard:
CLIP ID: 2026-10-19_salon-colour-care_c01_9x16_clean.mp4
CORE POINT: Hot showers strip salon toner faster than shampoo.
COVER TEXT (3-5 words in centre safe zone): Lukewarm Water Saves Colour

1. INSTAGRAM REELS CAPTION (Hook line + scannable checklist + max 5 hashtags):
Hot water opens the hair cuticle and rinses fresh salon toner straight down the drain.

Before your next wash, change three small habits:
- Dial the shower down to lukewarm for the 60 seconds you rinse your hair
- Keep the spray aimed below your shoulders while you wash your face
- Finish your conditioner rinse with cool water to seal the surface

Save this checklist before your next colour appointment so your gloss lasts six full weeks.
#haircolourcare #salontips #glossyhair #hairstylisttips #healthyhairroutine

2. FACEBOOK REELS CAPTION (Warm 2-line context + easy local/peer question):
We see this every week in the chair: a client invests in a fresh gloss and toner, takes three steaming-hot showers at home, and wonders why the warmth came back by Friday. Dropping the water temperature just for the 60-second hair rinse keeps your colour rich for weeks.
Are you a lukewarm-rinse convert, or is a hot shower non-negotiable in winter?

3. YOUTUBE SHORTS TITLE (Max 100 chars; main phrase in first 55 chars):
Why Hot Showers Fade Salon Hair Colour Fast (60-Second Fix) #shorts #haircare
Related Video link: [Select 16:9 Master Video in YouTube Studio]

4. TIKTOK CAPTION (Search-phrased hook + 3-5 specific search tags):
How to stop salon hair colour and toner fading after two washes: lower your rinse water temperature to lukewarm for 60 seconds so the cuticle stays closed.
#howtokeephaircolour #salontoner #fadedhaircolour #haircaretips
Template 3: tracking sheet columns for your 15-minute Sunday review
Create a simple spreadsheet with these twelve columns. Fill in one row per published clip seven days after it goes live:
| Column name | What to enter | Why it matters |
|---|---|---|
week_date | Monday ISO date (2026-10-19) | Groups all clips from the same master shoot together |
clip_id | c01 to c05 | Links the row back to the moment in your brief and file folder |
platform | IG, FB, Shorts or TikTok | Lets you filter performance by app |
hook_type | Mistake, How-to, Myth or Before-After | Shows which opening angle stops the scroll on each platform |
length_sec | Clip duration in seconds (28) | Reveals whether shorter or longer cuts hold your audience |
views_7d | Views after 7 full days | Baseline reach after initial distribution settles |
hold_3s_pct | 3-second hold or Viewed % | Judges the opening two seconds and cover/caption hook |
avg_watch_sec | Average watch time in seconds | Shows where the middle explanation held or lost people |
shares_per_1k | (shares / views_7d) * 1000 | Measures word-of-mouth and group-sharing value |
saves_per_1k | (saves / views_7d) * 1000 | Measures practical reference value |
profile_or_master_clicks | Profile visits or Related Video clicks | Tracks how many viewers took the next step |
next_week_note | One plain sentence on what to repeat or drop | Turns numbers directly into next Monday's 20-minute brief |
Template 4: file-naming cheat sheet
Tape this four-part pattern next to your monitor so every file in your media library and hard drive stays searchable a year from now:
- Master horizontal export:
YYYY-MM-DD_topic-slug_master_16x9.mp4 - Clean vertical clip export:
YYYY-MM-DD_topic-slug_c01_9x16_clean.mp4 - Vertical cover image:
YYYY-MM-DD_topic-slug_c01_cover_1080x1920.png - Subtitle sidecar file:
YYYY-MM-DD_topic-slug_c01_en.srt
Key takeaways
- To repurpose video content in three hours a week, run six fixed stages: Plan (20 min), Capture (35 min), Cut (50 min), Package (35 min), Schedule (25 min) and Measure (15 min).
- Plan four to six self-contained moments before you record, and pause for two full seconds between moments so clip boundaries show up clearly in your audio waveform.
- Record in 4K when possible with a dedicated microphone and keep the speaker inside the centre third of the 16:9 frame so a 9:16 vertical crop retains full 1080 by 1920 sharpness.
- Use one clean, watermark-free vertical MP4 across platforms, but write separate packaging for each feed: up to five niche hashtags on Instagram Reels, conversational context on Facebook Reels, a 100-character searchable title plus Related Video link on YouTube Shorts, and search-phrased captions on TikTok.
- Under Meta's March 2026 Facebook originality rules, Instagram's recommendation guidelines and YouTube's July 2025 monetisation policies, your own filmed footage is original—the penalties target recycled third-party clips, visible watermarks from other apps, and mass-produced repetitive templates.
- Free tools cover the whole workflow as of 17 October 2026: Edits by Instagram, DaVinci Resolve, FFmpeg, Meta Business Suite and PublishClip for editing, organizing and scheduling Facebook Reels and Instagram Reels.
Frequently asked questions
Short answers to common questions about turning one video into short clips for every platform.
What does it mean to repurpose video content?
To repurpose video content means planning and filming one core video so it can be edited and packaged into multiple native formats across several platforms. Instead of shooting separate videos for YouTube, Instagram Reels, Facebook Reels and TikTok, you record one high-resolution master video built around four to six self-contained moments. From that single recording, you export the full horizontal video, slice out four to six vertical 9:16 clips of 15 to 45 seconds, burn in readable captions, and write platform-specific titles, captions, hashtags and covers so each clip fits the feed where it appears.
How many clips can I get from one video?
A well-planned three-to-eight-minute video reliably yields four to six strong vertical clips of 15 to 45 seconds each. Be sceptical of marketing claims promising twenty or thirty viral clips from a single short video: forcing that many cuts out of a five-minute recording usually leaves you with fragments that start mid-sentence or repeat the same point. You get four to six genuinely useful clips when you map those moments before you press record, open each moment with a complete standalone hook sentence, and pause for two seconds before moving to the next point.
Is it bad to post the same video on every platform?
No, posting your own original, watermark-free video across Instagram Reels, Facebook Reels, YouTube Shorts and TikTok is not penalised. Platform originality rules from Facebook (updated March 2026), Instagram and YouTube (updated July 2025) target accounts that repost other creators' videos with only cosmetic edits or upload clips carrying another app's watermark. Your own footage is original everywhere you own the account. What hurts performance is pasting identical text packaging everywhere or blasting every platform at the exact same minute, so write native captions and titles for each app and stagger your schedule across the week.
Should I use AI clipping tools?
AI clipping tools can speed up rough transcript searches on hour-long podcasts or webinars, but you do not need one for a focused three-to-eight-minute weekly video. When you map four to six moments in advance and leave a two-second silent gap between them while filming, you can spot and slice every clip in a free editor like DaVinci Resolve or Edits by Instagram in minutes. Many automated clipping tools also lock watermark-free 1080p exports behind paid monthly subscriptions or misjudge visual framing, so check their live pricing and export terms carefully before relying on them.
How often should I post short videos?
A sustainable cadence for most small businesses and solo creators is three to five short vertical videos per week per active platform, all cut from one weekly recording session. Posting four well-hooked, clearly captioned clips every week for six months beats posting twice a day for ten days and burning out. Keep your weekly production inside a fixed three-hour block. Schedule your Facebook Reels and Instagram Reels ahead of time in PublishClip or Meta Business Suite. Upload your YouTube Shorts and TikToks in one batch. And respect Meta's daily API caps: 30 Facebook Reels and 50 to 100 Instagram posts per 24 hours.
Do I need different captions on each platform?
Yes, writing a separate caption or title for each platform takes only a few minutes per clip and matches how each app works. Instagram Reels rewards a strong opening line before the fold, a saveable checklist in the body, and up to five specific hashtags. Facebook Reels performs best when the first two sentences read like a warm, conversational note or question that invites comments and group shares. YouTube Shorts displays a 100-character searchable title rather than a long social caption, while TikTok matches spoken words and search-phrased captions to what viewers type into the search bar.
Can I repurpose old videos?
Yes, your existing archive of horizontal YouTube videos, client webinars, product demonstrations and past livestreams is one of the fastest places to find vertical clips without filming anything new. Start by sorting your older videos by watch time, customer enquiries or evergreen relevance, then pull the top five recordings into your editor. Look for 20-to-40-second explanations that still hold true today, crop or stack them into a 1080 by 1920 vertical frame, add fresh burned-in captions and a new cover image, and write current captions for Instagram Reels, Facebook Reels, YouTube Shorts and TikTok.
Sources and how this was checked
Last checked: 17 October 2026. We opened the official platform policies, developer guides and vendor pricing pages listed below on 16 and 17 October 2026. Because platforms update limits and vendors change free-plan rules without notice, verify any critical limit on the linked source page before you build a campaign around it.
Originality, recommendation and monetisation policies
- Meta newsroom, March 2026: Rewarding original creators on Facebook
- Meta Business Help Centre: Original content guidelines on Facebook
- Instagram Help Centre: About original content on Instagram and Recommendations on Instagram
- YouTube Help (updated 15 July 2025, checked 17 October 2026): YouTube channel monetization policies (inauthentic and reused content)
Editing tools, publishing APIs and insights
- Instagram Creators & Help Centre: Edits by Instagram and About Edits
- FFmpeg documentation: FFmpeg Filters Documentation (
crop,scale,pad,gblur,overlay,vstack,subtitles,ass,drawtext) - Meta for Developers: Reels Publishing API for Pages, Instagram Content Publishing Guide and IG User Content Publishing Limit Reference
- Meta Business Suite & Insights: Meta Business Suite for Creators and View insights on your Instagram reels
Pricing pages and platform updates
- Vendor pricing pages (read 16–17 October 2026): Buffer Pricing, Later Pricing and Metricool Pricing
- Meta subscription announcement (15 September 2026): Introducing Meta One
- Trade report on Instagram's 5-hashtag cap (18 December 2025): Social Media Today: Instagram implements new limits on hashtag use
What we could not confirm
- Reels-specific caps on free third-party schedulers: While Buffer and Metricool state their overall channel and monthly post limits on their pricing pages, neither pricing table spells out whether every Reels feature works identically on the free tier, so test one scheduled Reel before committing a full month's queue.
- Secondary claims about an April 2026 Instagram policy expansion: Several third-party marketing blogs reference an April 2026 expansion of Instagram's originality penalties, but we could not verify that date on a primary Meta or Instagram Help page; we rely only on Meta's March 2026 announcement and Instagram's official Help Centre pages.
About this guide
This guide is written and maintained by the team behind PublishClip, and our descriptions of PublishClip Studio, the media library, caption templates and the Reels scheduler reflect the live codebase as of 17 October 2026. If you spot a policy change or an outdated figure, let us know.